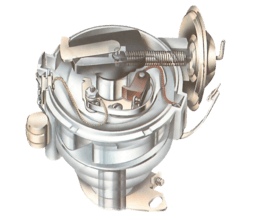
Adjusting the distributor
The timing mechanism in the ignition system causes the sparkplug to fire in each cylinder just before the piston reaches top dead centre (TDC) on its compression stroke.
That gives time for the mixture to start burning steadily as the piston passes through TDC. The resulting expansion of burning gases will thereby be most effectively used throughout the power stroke.
The timing of the spark is measured as the number of degrees by which the crankshaft is short of bringing the piston in the timing cylinder (usually No. 1, but consult the handbook for your car) to TDC.
This video course is the best way to learn everything about cars.
Three hours of instruction available right now, and many more hours in production.
- 4K HD with full subtitles
- Complete disassembly of a sports car

The number of degrees varies from car to car (again consult the handbook).
Static timing means setting the timing with the engine stopped.
You set the crankshaft at the correct number of degrees before top dead centre, then adjust the distributor by turning it until the contact-breaker points are just opening.
However, this method of timing takes no account of wear and backlash in the distributor drive. The timing can be slightly out, even at idling speed. The spark will occur later than it should, particularly at high engine speed, and the engine will not develop full power.
Stroboscopic timing (see overleaf), by which the timing is checked and set with the engine running, is more accurate.
Some manufacturers disapprove of their cars being statically timed, and give only a stroboscopic figure in their handbook.
But static timing is simpler, and can be done with a circuit tester or a test lamp. It is adequate for the initial setting of the timing mechanism before fine tuning.
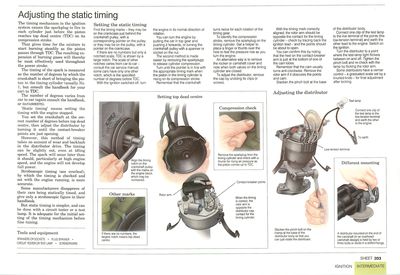
Setting the static timing
Find the timing marks - they may be on the crankcase just behind the crankshaft pulley, with a corresponding pointer on the pulley; or they may be on the pulley, with a pointer on the crankcase.
If there are no numbers but only a notched scale, TDC is shown by a large notch. The scale of other notches varies from car to car consult the car service manual; some cars have only one other notch, which is the specified number of degrees before TDC.
With the ignition switched off, turn the engine in its normal direction of rotation.
You can turn the engine by putting the car in top gear and pushing it forwards, or turning the crankshaft pulley with a spanner or socket on the nut.
The second method is made easier by removing the sparkplugs to release cylinder compression.
Turn until the pointer is in line with the appropriate timing mark when the piston in the timing cylinder is rising on its compression stroke.
Remember that the crankshaft turns twice for each rotation of the timing gear.
Other marks
If there are no numbers, the largest notch means top dead centre.
To identify the compression stroke, remove the sparkplug on the timing cylinder. Get a helper to place a finger or thumb over the hole to feel the pressure rise as you turn the engine.
An alternative way is to remove the rocker or camshaft cover and note when both valves on the timing cylinder are closed.
Compression check
Remove the sparkplug from the timing cylinder and check with a thumb for rising air pressure as the piston comes up to TDC.
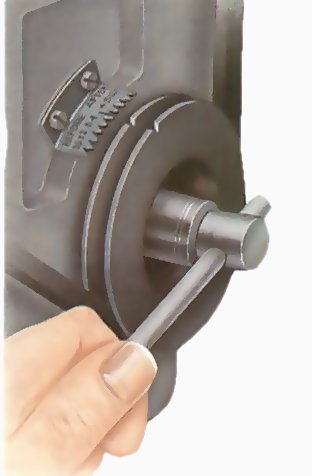
To adjust the distributor, remove the cap by undoing its clips or screws.
With the timing mark correctly aligned, the rotor arm should be opposite the contact for the timing cylinder - check by tracing back the ignition lead - and the points should be about to open.
You can confirm this by noting that the heel on the contact-breaker arm is just at the bottom of one of the cam lobes.
Remember that the cam usually turns anti-clockwise. Remove the rotor arm if it obscures the points and cam.
Slacken the pinch bolt at the base of the distributor body.
Connect one clip of the test lamp to the live terminal of the points (the low-tension terminal) and earth the other lead to the engine. Switch on the ignition.
Turn the distributor to a point where the test-lamp light flickers between on and off. Tighten the pinch bolt and re-check with the lamp by flicking the rotor arm.
Some distributors have a vernier control - a graduated scale set by a knurled knob - for final adjustment after locking.

