Vous pourriez avoir besoin de
Driven wheels - independent suspension
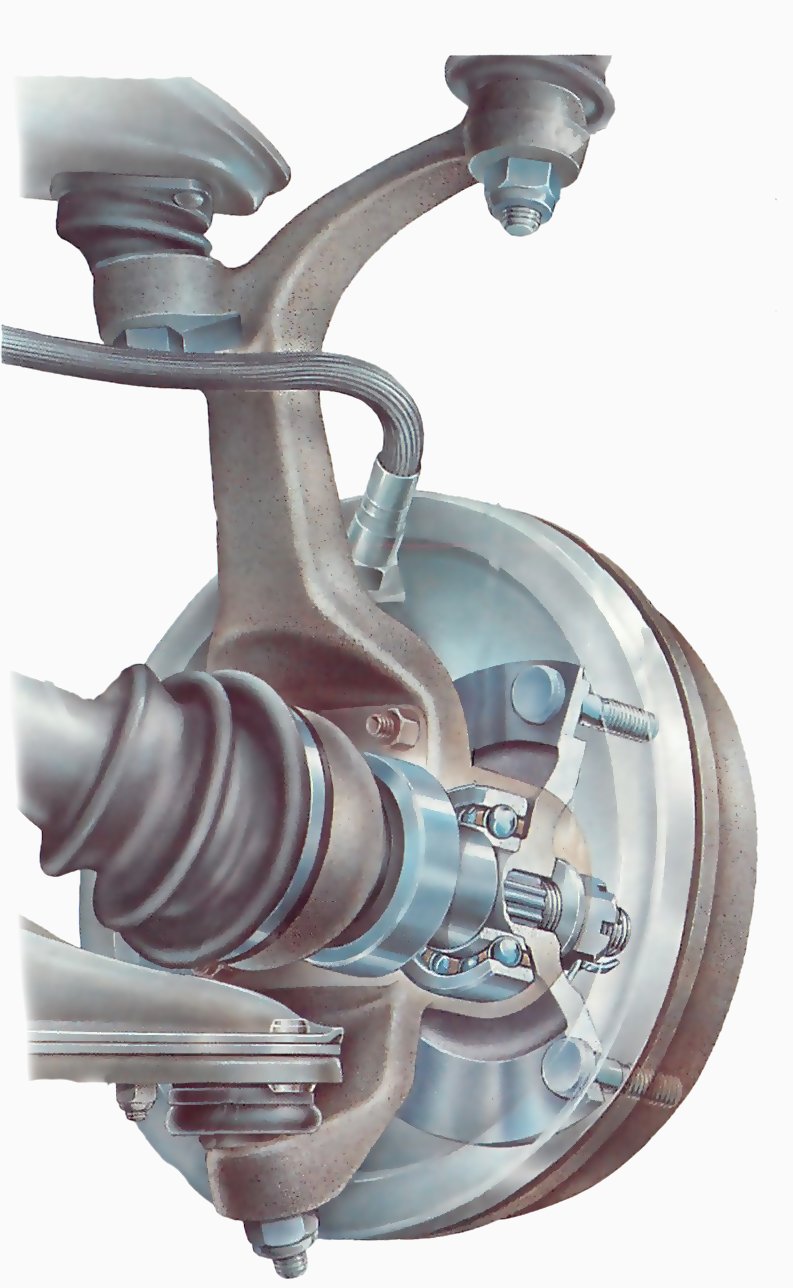
Front-wheel-drive bearings
A front-wheel-drive system with the inner and outer wheel bearings inside a hollow hub carrier. They are separated by a short tubular spacer. The drive shaft runs through them into a splined drive flange, to which the wheels are bolted.
Cars with front-wheel drive have front-wheel bearings that resemble closely those in the rear wheels of rear-wheel-drive cars which have independent suspension (See How car suspension works).
The type of bearing used also has much in common with non-driven wheel bearings (See Checking the half shafts). However the bearings of live rear axles are quite different.
This video course is the best way to learn everything about cars.
Three hours of instruction available right now, and many more hours in production.
- 4K HD with full subtitles
- Complete disassembly of a sports car

The main difference between driven and non-driven hubs is that a drive shaft projects into a driven hub from the inner side.
With non-driven bearings the hub turns outside a central, stationary, solid stub axle.
In some driven hubs the arrangement is similar, except that the `stationary axle' - the hub carrier is hollow and the drive shaft runs through it to connect with the hub.
The hub bearings are exactly like those of a non-driven hub, and you dismantle them in the same order. But it is usual for the 'hub' - properly called the drive flange - to turn on bearings inside the hub carrier. So the inner race revolves, while the outer race is stationary.
There is likely to be a plastic water shield on the inner side of the hub assembly, either attached to the drive shaft or clipped to the hub carrier.
There is also an extra grease seal on the outboard side of the pair of bearings. As usual, renew all grease seals whenever you dismantle a hub. There may be additional spacer rings between the seals and bearing races.
Details vary from car to car: when dismantling, make notes or drawings of how all these parts are arranged and which way round they go.
Dismantling a driven hub
Dismantling is much the same as for a non-driven hub (See Removing wheel bearings). But there is one major difference — the hub nut is usually very tight; if possible, loosen it with the wheel on the ground.
Remove the hub dust cover and hub-nut locking device in the usual way — on some cars this means raising and removing the wheel, then replacing and lowering it.
If possible, loosen or tighten the hub nut with the wheel on the ground.
If the wheel is removed, wedge a metal bar across the wheel studs so that the end of the bar bears on the ground and locks them to resist the turning force of the socket spanner as you loosen the nut.
The force needed to loosen the nut is such that you may have to prevent the car from moving — you may even need someone inside applying the brakes.
Extend the handle of a socket wrench with a length of pipe for extra leverage. Check if the hub nut has a right or left-hand thread, then loosen it.
On cars with no central hole in the wheel, loosen the hub nut with the wheel off: a helper applying the brakes is essential.
Work with the car raised on axle stands under frame members. Chock the wheels that are on the ground, and apply the handbrake if it operates on those wheels; otherwise release it. Loosen wheel nuts before raising the wheels.
Move aside a disc caliper or take off a brake drum (if not integral with the hub) in the usual way (See Renewing drum-brake shoes).
Front-wheel drive
On a front-wheel-drive car, remove the entire hub-carrier assembly.
Unscrew the nuts from the steering ball joints, and uncouple them with a ball-joint separator.
If the car has a MacPherson strut (See Renewing MacPherson-strut inserts), remove it from the body and the track control arm (but with unit replacement suspension remove the lower half of the strut only).
You may now be able to pull the hub carrier free. If not, disconnect the drive-shaft outer joint (See How to check U-Joints). Support the part of the drive shaft that remains on the car to avoid straining its joints.
Rear-wheel drive
On a rear-wheel-drive car you may not need to remove the hub carrier: if you can disconnect the drive shaft, you can dismantle the hub with the carrier still in place.
The inner race of an inboard tapered roller bearing may remain on the drive shaft. If so, tap it off gently with a soft-faced hammer.
Detach the water shield from the hub carrier. Prise out the inboard oil seal, taking care not to scratch its seating. You may now be able to pull the drive flange out of the hub carrier.
If not, support the carrier on blocks (if detached from the car) and knock the flange out, using a suitable socket or pipe as a drift to avoid hammering it directly.
The bearings may remain in the hub carrier, in which case you can remove them in the same way as bearings remaining in a non-driven hub.
With tapered roller bearings, if you only want to check and lubricate them, there is no need to drive out the outer races if you can still see them clearly.
The inner race of the outboard bearing may come out on the drive flange and need a bearing puller to get it off.
The outboard grease seal may also be left on the drive flange. Prise it free, taking care not to scratch its seating, and discard it.
Clean, check, renew, lubricate and reassemble.
Reassembly
The procedure for refitting a driven hub is exactly the same as for a non-driven hub. Clean all parts thoroughly (except plastic shields) with paraffin or white spirit, inspect bearings and renew if damaged.
Lubricate the hub with an approved grease, consulting the car handbook or a dealer for details of the type and quantity.
To reassemble the hub, reverse the dismantling procedure, fitting new grease seals with care to avoid damaging them.
Fit the hub nut (See Removing wheel bearings). If possible, lower the car on to its wheels to tighten the hub, and use a torque wrench to obtain the correct torque setting for the car.


