Vous pourriez avoir besoin de
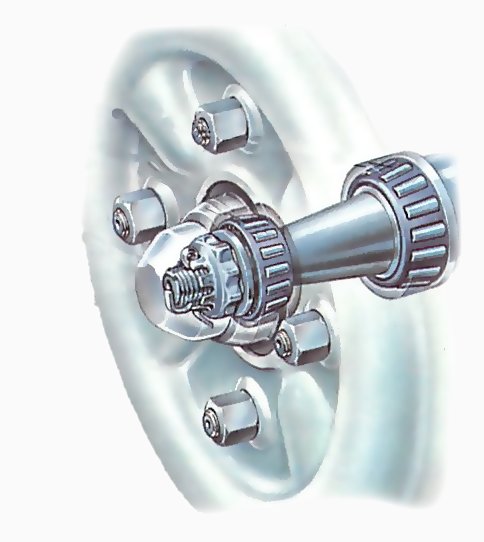
Hub bearing layout
The same basic bearing layout is used on front and rear hubs, except for those of live axles; however inner details of driven hubs are different.
Wheel bearings need periodic checking - and adjusting if necessary - usually at 12,000 mile service intervals.
At longer intervals - usually of 36,000 miles - they need repacking with grease (See Removing wheel bearings).
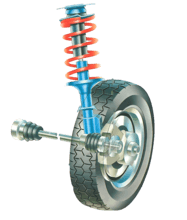
Bearings on the front wheels of rear-wheel-drive cars and the rear wheels of front-wheel-drive cars are of broadly similar design.
This video course is the best way to learn everything about cars.
Three hours of instruction available right now, and many more hours in production.
- 4K HD with full subtitles
- Complete disassembly of a sports car

However, driven front wheels and driven rear wheels on cars with independent suspension generally have their hub nuts tightened to a high torque setting, and quite often no routine servicing adjustment is specified.
Where adjustment to these driven wheels is possible, the method varies. The rear-wheel bearings of live axles are not adjustable.
Adjusting non-driven bearings
The bearing is adjusted by tightening the hub nut if it is too loose, or loosening the nut if it is too tight. It should be done with the wheel on and raised on an axle stand.
Check for bearing wear
Rock the wheel from side-to-side and top-to-bottom to check for bearing wear.
You may have to take off the wheel to remove the trim: put the wheel back on before starting adjustment. If you have to remove the wheel, loosen the wheel nuts before raising it. Once this wheel is raised, support it on an axle stand.
Chock one of the other wheels on each side of the car.
If you are adjusting a wheel on which the handbrake works, release the handbrake.
Prise off the dust cap with two medium-sized screwdrivers, levering its raised flange away from the hub on both sides at once.
A neglected cap may take some time to free. If it sticks you may be able to hammer it off without damaging it beyond repair - but covers are cheap to replace.
The hub nut may be a castellated nut retained by a split pin, or a plain nut under a castellated retainer held by a split pin.
It may be a plain nut which has been locked by 'peening' it punching its outer edge to make the metal spread into a groove in the threaded axle end.
Some VWs have the fourth type: a threaded collar which is squeezed tight by a nut and bolt at one side. The collar does not fit an ordinary socket wrench, but can be turned by a self-locking wrench.
Check that you have a socket big enough to fit the hub nut. If a split pin is used, you need some replacement pins of the right size. A peened nut must be renewed every time you adjust the bearing.
There should be some grease on the axle end and nut. If it is very dirty, the bearing should be stripped down and repacked with clean grease (See Removing wheel bearings).
If there are traces of metal in the bearing, it is disintegrating and should be renewed at once (See Removing wheel bearings). If the grease looks clean, wipe it away with a rag.
Straighten the split pin and pull it out with pliers. Discard the pin and fit a new one later. Remove any castellated retainer.
With a peened nut, use a small cold chisel and hammer to raise the peening from the axle groove. You do not need to lift it out completely: the leverage of a socket wrench is enough to flatten any remaining lumps.
With a VW collar, loosen the cross bolt.
Some cars have a left-hand thread on nearside hub nuts, especially at the rear. Check the thread before proceeding.
Loosen the hub nut a few turns, or if it is a peened nut remove it and screw on a new one loosely. If you have removed the wheel replace it temporarily, tightening the wheel nuts just enough to hold it firmly.
Set your torque wrench to the correct figure for the hub nut. Settings vary greatly from car to oar (from 11 to 60 lb ft - 1.5 to 8.3 kg m) and must be correct. Consult a service manual or a local dealer if necessary.
VW hub collars do not need setting to an exact torque.
Use one hand to turn the wheel slowly in its normal forward direction of travel, and tighten the hub nut to the correct torque with the other.
Tightening the hub nut
Turn the wheel slowly while you tighten. Lower to tighten finally.
You should be able to feel the wheel spinning smoothly, though it will begin to drag as you tighten the nut. If there is any actual grating or roughness, the hub bearing should be renewed.
On some cars you leave the nut at the recommended torque setting. On most, however, you slacken it by a half or quarter turn; though on some you then retighten to the recommended torque setting.
Check the specific adjustment method with a service manual or your local dealer. Then repeat the wheel-rocking check. You should be able to feel the barest hint of play. The wheel should also still turn smoothly.
On some cars (including the VW with hub collar), a screwdriver is used to probe alongside the hub nut at the thrust washer behind it. If you can just move the washer, the adjustment is correct.
Lock the nut in position. A castellated nut must be moved to align one of its slots with the pin hole in the axle end. Move it the shortest possible distance, whichever way that is.
If the move tightens the nut, check that the wheel still turns freely. If it does not, loosen the nut one notch. This problem does not arise with other types of hub nut.
Fit a castellated retainer, if used. Insert a new split pin, if used, and cut and bend back its ends.
Give a peened nut a few light taps with a hammer and punch to spread it into the slot. On a VW collar, tighten the cross bolt.
On some cars you half fill the dust cap with fresh bearing grease before refitting it.
Remove the wheel, if necessary, and refit the cap. Hold the cap squarely in place and tap it home with a soft-faced hammer. Be sure to keep it straight.
Refit the wheel and lower the car to the ground.
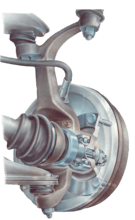
Adjusting driven bearings
The hub nuts of driven wheels (except on live axles) call for quite high torque settings (from 150 to 200 lb ft - 21 to 25 kg m), so you must lower the wheel to the ground with the car's weight on it for final tightening. Consult the handbook for the correct torque setting, if routine adjustment is specified.


