Vous pourriez avoir besoin de
Pull out the brush assembly.
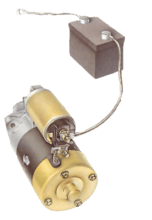
Both inertia and pre-engaged starters can have one of two types of commutator.
It may be a cylindrical commutator, like that on a dynamo, with the brushes bearing on the side face.
Or it may be a face-type commutator, which has a flat disc at its outer end, with the brushes bearing against the disc.
This video course is the best way to learn everything about cars.
Three hours of instruction available right now, and many more hours in production.
- 4K HD with full subtitles
- Complete disassembly of a sports car

The brushes, made of a copper and carbon alloy, are in housings on the endplate of the starter. There are usually four brushes; occasionally two.
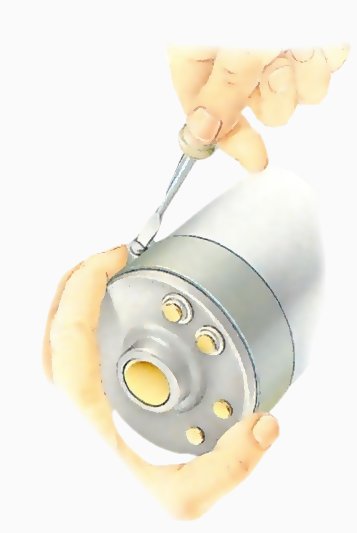
Most starter motors have to be removed and partly dismantled (See Stripping the starter motor) to inspect or replace brushes. However, some have a removable band which lets you check at least two of the brushes with the motor in place.
On a few, you can replace brushes with the motor in place, through a hole in the side of the endplate.
On all inertia starters with face-type commutators, brushes can be replaced without removing the armature/commutator. On a pre-engaged starter, the built-in solenoid is removed (See Stripping the starter motor).
Unless you have a service manual which gives a figure for the maximum allowable brush wear, assume that there must be at least A in. (8 mm) of brush beyond the brush lead.
Always check that new brushes slide smoothly in their guides. If they stick, remove raised spots with a fine file.
Clean the commutator with methylated spirit. Let it dry fully before reassembling. Petrol is not recommended - a spark could ignite petrol vapour and cause an explosion.
If the commutator stays discoloured, clean it with very fine glasspaper. If the surface is badly worn, buy a new or exchange starter.
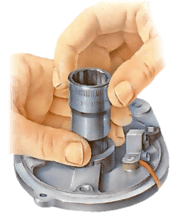
Removing the endplate
Unscrew and pull out the two long bolts to release the endplate; pull out the armature.
Undo two screws to release the brush assembly.
Pull out the brush assembly.
On a motor which does not have inspection windows, you can check the brushes and clean the commutator, but replacing the brush set is a job for an auto-electrician.
The leads are insulated in a way which makes soldering on a new brush impossible.
To reach the brush assembly, remove the two long, slot-headed bolts which hold the motor together.
Take off the endplate and pull out the armature to check the commutator.
Release the brush assembly from inside the endplate by removing two screws.
Lift each brush out of its guide for measuring by pulling the coiled spring off the top of the brush and pulling up the brush.
Put the brush partway back into its guide and wedge the spring against its side, so that the spring does not push the brush fully in.
That allows the commutator to be inserted between the brushes without damaging them during reassembly.
Replacing brushes
Measure the length of the brush from its contact face to the start of the lead.
Measure the length of each brush from the face to the near end of the lead.
There must be at least 8mm of brush beyond the lead.
To refit a brush, prise up the spring and slide the brush under it. Make sure it is the right way up. Screw down the lead firmly.
Refitting
Wedge the brush spring against the side of the brush.
Make sure that all the brushes are wedged halfway in their guides by means of their coiled springs otherwise you cannot push the commutator back into place.
Screw the brush assembly to the endplate, and put the commutator between the brushes. Release the springs so that they push the brushes down into contact with the commutator. Put the endplate back on to the motor, and reattach it by the two long slot-headed bolts.
Replacement
On face-type commutator starters there are two ways of fastening on the endplate, under which the brush assembly is housed.
The endplate may be bolted on, but sometimes it has a circular, toothed spring clip, normally hidden under a rubber cover. The clip is difficult to lever off and is not reusable.
Not all dealers stock replacements; so be sure to have a new clip ready if you remove it.
Each brush lead of a pair is of a different length. Note which brush fits where before you take them out. Both designs have two of the four brush leads fixed to their field coil mountings by a pressure aluminium weld.
You can neither break nor renew this joint. Instead, cut the lead off near the brush, leaving a short tag. Solder the new lead on to this tag.
If you use abrasive paper to clean a cylindrical commutator, wrap it round and apply pressure evenly to avoid making the drum oval.
For cleaning a face-type commutator, wrap the abrasive paper round a block of wood so that the face is kept perfectly flat.
The metal of face-type commutator segments is very thin, so take care even moderate wear or pitting calls for replacement.
Replacing brushes
The four brushes
Cut the old lead off short, leaving a tag.
Two of the brushes come already fixed to a terminal post, so are easily replaced.
The others are welded. Cut the leads off short at the brush end, leaving a i in. (10mm) tag. File each tag to expose plenty of bright metal. Coat it with solder, using a gas soldering-iron - a small electrical one is not powerful enough. Coat also the ends of the new leads.
Solder the new lead to the tag.
Solder the new leads in place, ensuring that the joints are solid, neat and flat.
Removing an endplate with a spring clip
Remove the rubber cover and lever off the clip.
Lever off the spring clip with a screwdriver, taking care not to damage the end of the shaft.
The clip is usually circular, with a toothed or serrated edge, and may be hidden under a rubber cover. Discard the clip.
Remove the two long, slot-headed bolts which hold the motor together. Lift off the end to expose the brush assembly and commutator.
When reassembling, tap a new clip home with a piece of pipe or suitably sized socket and a hammer. Make sure the clip is fully home before refitting the rubber cap.
Remove the two long bolts to release the endplate.
Note which of the brushes has the longer lead before you take them out.
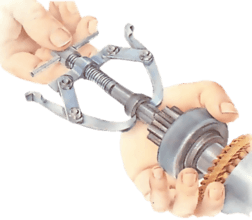
Removing a bolted endplate.
First remove two screws from the pinion-gear end of the motor.
Before unbolting the pinion endplate from an inertia type of starter, loosen the nuts on the two large, protruding, brush-retaining bolts.
Pull out the pinion endplate and armature together.
The pinion, endplate and armature can then be pulled straight out of the motor housing as a single assembly.
Take care not to damage the armature or commutator faces as you withdraw it.
The brushes on this type of starter often have convex faces bearing against the commutator. Making sure the new brushes are fitted the right way round before you reassemble the starter.
