Removing the brushes
Undo the screws holding the brush cables.
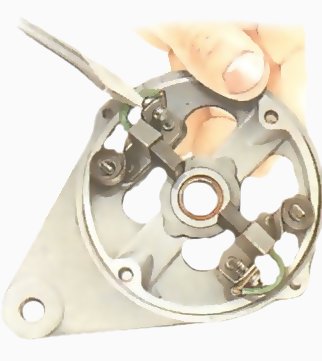
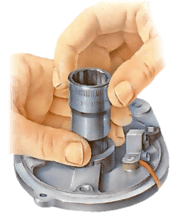
The carbon brushes are a sliding fit in oblong holders on the dynamo endplate. Coiled springs bear against the tops of the brushes to hold them in contact with the commutator.
Each brush also has a braided wire or cable attached by a screw. The cable from one brush leads to earth, and that from the other to the dynamo output terminal.
This video course is the best way to learn everything about cars.
Three hours of instruction available right now, and many more hours in production.
- 4K HD with full subtitles
- Complete disassembly of a sports car

Undo the screws holding the cables, push the ends of the coiled springs to one side of the brush holders, and pull the brushes out.
Push the spring to one side and remove the brush.
Note exactly how they were fitted, so that if you refit the same ones later, each goes back as before.
If a brush is reversed, it may not seat properly on the commutator.
Measure the length of the brushes. If the carbon is worn down to a thickness of in. (10 mm) or less, fit new brushes.
However, even if the carbon thickness is down to in. (13 mm) it is still best to replace the brushes. If the brushes are not too worn they are normally about 1 in. (25 mm) long - they may have been sticking in their holders and not contacting the commutator properly.
Before refitting the endplate, push the end of the coiled spring from the top to the side of the brush to wedge it in the holder.
Use a fine file to remove any raised spots from the surfaces of the brushes. Clean out the holders with a petrol-soaked rag. Replace them in their holders and check that they slide freely and do not rock from side to side.
Refitting the brushes
Use a screwdriver through the hole in the endplate to move the end of the coiled spring from the side to the top of the brush, to push it into contact with the commutator.
Always clean the brush holders thoroughly before fitting new brushes.
The ends of the brushes must be shaped to match the curve of the commutator.
If they are not, remove the armature and wrap fine glasspaper around it, abrasive side outwards (do not use emery paper).
Fit the endplate over the commutator, and turn it so that the brushes bear against the glasspaper and are shaped to match the curve of the commutator.
Replace the brushes in their holders and reconnect their cables to the output and earth terminals.
Check that the brushes are a smooth, sliding fit in the holders.
If they are too loose they might tilt and jam in the holders.
Make sure the brushes do not stick out of the inner ends of the holders. Wedge them in place by adjusting the ends of the coiled springs to bear against the sides of the brushes instead of the top.
Doing so enables you to refit the endplate and brush-holder assembly without damaging the inner ends of the brushes, which would otherwise catch on the commutator.
With the endplate refitted, reassemble the dynamo with its two long bolts.
Take a small screwdriver, and working through the ventilator holes in the endplate (or the inspection 'windows'), move the ends of the coiled springs from the side of each brush to the top, so pushing it down into contact with the commutator.
Inspecting the commutator
Glazing
The commutator segments have a varnished look. This coating may be due to dust and water inside the casing, or to particles worn from the brushes or the mica insulation strips between segments.
Scores and pits
Usually pitting and scoring of the commutator segments are caused by electrical arcing between the commutator and badly fitted, poorly seating or worn-out brushes.
Melted solder
Overheating can melt the solder connections between the segments and the armature windings. Sever cases show as a ring of melted solder around the inside of the casing.
Faulty insulation
The mica strips stick up between segments, stopping the brushes making contact. This is caused by wear or arcing removing surface copper. One of the segments has also cracked.
Check the condition of the commutator every time you remove the dynamo from the car - even if you are doing so only to inspect the brushes.
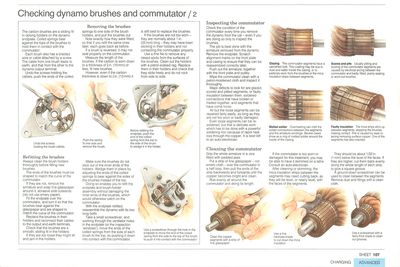
The job is best done with the armature removed from the dynamo. Remove the endplate. Scratch alignment marks on the front plate and casing to ensure that they can be reassembled correctly later.
Push out the armature, together with the front plate and pulley.
Wipe the commutator clean with a petrol-moistened cloth and inspect it thoroughly.
Major defects to look for are glazed, scored and pitted segments, or faulty insulation between them; soldered connections that have broken or melted together; and segments that have come loose.
All but the loose segments can be repaired fairly easily, so long as they are not too worn or badly damaged.
Even loose segments can be re-soldered, but that is delicate work which has to be done with a powerful soldering iron because of rapid heat loss through the copper. It is best left to an auto-electrician.
Cleaning the commutator
Clean the copper segments with a strip of fine glasspaper.
Grip the whole armature in a vice fitted with padded jaws.
Put a strip of fine glasspaper - not emery cloth - over the commutator in a half loop, then pull the ends of the strip backwards and forwards until the copper becomes bright and clean.
Use a fine hacksaw blade to cut down the fine mica insulation.
Rub evenly all around the commutator and along its length.
If the commutator is too worn or damaged for this treatment, you may be able to have it skimmed on a lathe. Consult an auto-electrician.
After cleaning or skimming, the mica insulation strips between the segments may need cutting back, as they will be level, or nearly level, with the faces of the segments.
Use a screwdriver with a fairly thick blade to clean out grooves.
They should be about 1mm below the level of the faces. If they are higher cut them back evenly along the whole length of each strip to give a good square groove.
A ground-down screwdriver can be used to clean between the segments. Remove the dust and fillings with a clean cloth.


