Electric windows are being fitted to more and more cars as standard equipment, while conversion kits are available to suit most models.
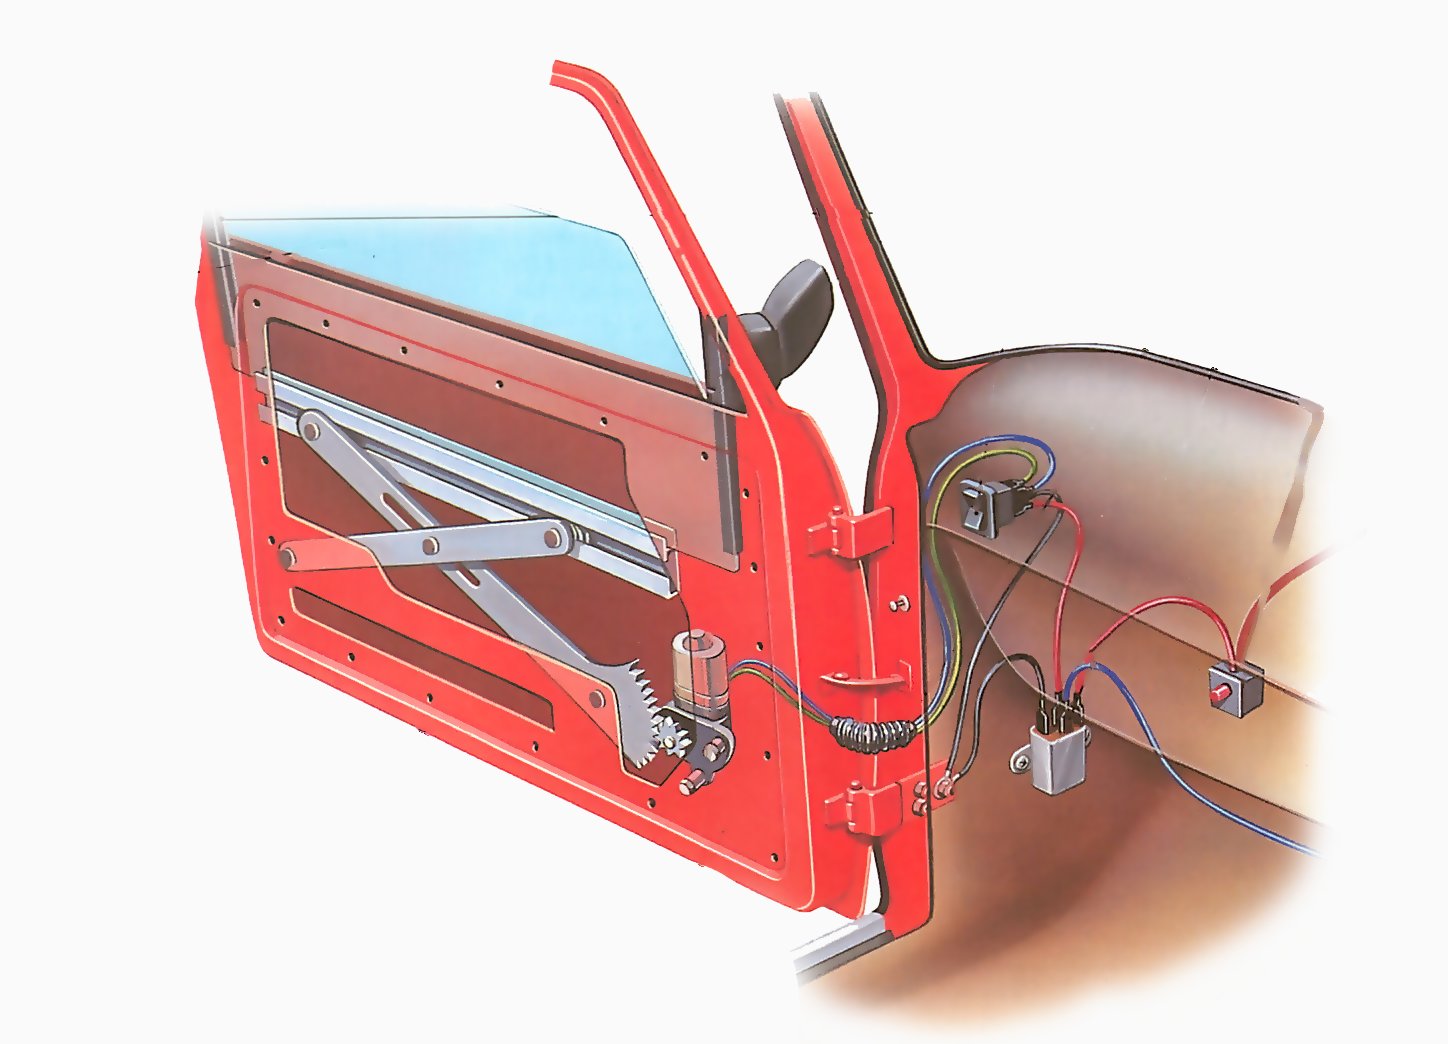
An electric window circuit
A typical system is similar in many respects to a manual window-winding mechanism, except that the manual winder handle is replaced by a motor.
The system usually consists of a two-way control switch in the dashboard or centre console, wired via two circuits to a motor in each door. One switch position and circuit drive the motor one way to wind the window up; the other switch position and circuit wind the window down.
The switch is wired to the battery via a relay and a fuse or a circuit breaker.
Although they can be a real convenience (no more leaning over the passenger seat to open or close the window) they can also be a considerable annoyance when they stop working. Fortunately, however, both the mechanical and the electrical parts of the system are fairly straightforward for the advanced DIY mechanic to work on.
Identify the fault
This video course is the best way to learn everything about cars.
Three hours of instruction available right now, and many more hours in production.
- 4K HD with full subtitles
- Complete disassembly of a sports car

The most obvious fault with electric windows is that they fail to operate. If the problem occurs on all windows you can be pretty sure that the fault is in the main wiring circuit, and this is also the region to check first even if the problem is restricted to just one window. Try listening to see if you can hear the motor operating - if it is, but the window does not move, the problem lies in the mechanical linkage.
Slow or jerky operation and mechanical noise point to a problem with the mechanism, window guides or drive motor of the window concerned - the fact that the window is partially working shows that the electric circuit is complete.
Similarly jamming part way through the motion is probably due to the mechanism or the window guides, and if there are rattles from the door the window guides may be loose.
Erratic operation, with the window working perfectly sometimes and then playing up, is most likely due to an intermittent electrical fault, such as a loose connection.
Check the fuse
Most window circuits are protected by a fuse or cutout in the supply line and this is the first place to check if the windows refuse to operate. With some arrangements a single fuse in the main supply line is used to protect the complete window system so a failure here affects all the windows. Other cars have individual fuses for each window motor so failure will only affect the one window.
In some cars the fuse is in the main fusebox but many makers use in-line fuses so check with your manual to find where the fuse is and replace it if blown. Instead of a fuse the system may be fitted with a circuit breaker.
Then test the window. If it works properly the fuse probably blew (or the cutout tripped) due to a temporary overload. However if the new fuse blows immediately you will have to investigate further.
Power supply check
Generally the power for the window circuits (which draw a large current) is supplied direct from the battery through a relay (or relays) actuated by turning the ignition on. Find the relay position from your car handbook.
Use a test lamp to check that current is reaching the relay. With the ignition turned on check for current at the relay control terminal. If there isn't any the problem lies in the wiring from the ignition switch. Then test the output side of the relay - current means the relay is faulty and should be replaced, otherwise the problem lies in the control switches, the wiring or the motor itself.
Electrical faults
Check for current on both motor terminals.
To continue checking remove the door trim so you can get at the motor. Generally you can do this by unscrewing items such as ashtrays, door handles and control panels and then unclipping the trim panel.
The opening in the inner door may be lined with a plastic condensation sheet which has to be pulled (or in some cases cut) loose and put carefully to one side until needed for refitting.
Check for current at the two-way switch.
Once you have gained access to the motor check both the power supply wires leading from the switch as you operate the control switch. If you find there is current in both the wires the problem lies with the motor which should be investigated further. Alternatively if there is no current in the wires, or only in one, the problem lies in either the control switch or the wiring.
Check the wiring between the door and door pillar for breaks.
When making this check on passenger doors remember that there may be an isolating switch in the control console which has to be set on before the individual door switches will work.
To check the switches and wiring work back from the motor terminals using your test lamp to check each connection or switch assembly in turn. One area that is particularly prone to failure is the wiring that passes between the door and the main body of the car and is flexed each time the door is opened.
Replace any broken wires and faulty switches, remake any loose connections, and insulate any chafed wires. After making repairs retest the window to see if you have solved the problem. If not continue with your tests since there may be more than one fault in the circuit.
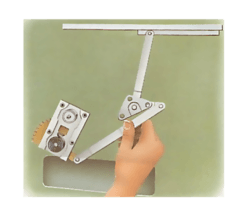
Check the mechanism
Make sure the cable is correctly tensioned.
Sticking and jerky operation is often due to troubles with the window mechanism. To check it start by removing the door trim. Look over the mechanism to see if there is any obvious damage and make sure there is nothing that might make it jam - loose wires in the door cavity are a particular risk. Then operate the motor and watch the mechanism to see if it runs smoothly or if there is excessive play anywhere in the system.
Make sure the winding mechanism is securely fixed to the door.
Badly worn mechanisms will have to be replaced but sticking ones can often be eased by lubricating them. Use light oil (preferably with a graphite additive) for the pivot points and grease on the window sliders and the gear drive teeth. Only apply small amounts of lubricant at a time, operating the window between applications to ensure good penetration. Assuming that the windows now operate normally wipe up any excess lubricant and replace the door trim.
Lubricate the gear drive to make sure it runs smoothly.
A common cause of sticking mechanisms is corrosion due to excessive water penetrating past worn weatherseals. If you think this is the case fit a new seal.
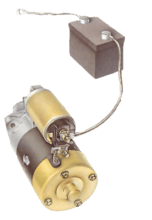
Should the action remain sluggish the problem may lie in the motor so remove it to check. If the motor appears to be running (you may be able to hear it or feel the vibrations) but there is no movement the gear drive between motor and mechanism has probably failed so remove the motor to check it.
Motor service
In most cases before you start to dismantle the regulator mechanism it is a good idea to fasten the window up in the closed position by taping it to the frame to take the weight off the mechanism. However with some cars the window has to be in the lowered position to allow you to unbolt the carrier from the window. So be prepared to undo the tape, lower the window and re-tape if necessary.
The way the motor assembly is fitted varies with the precise design of mechanism but start the removal process by disconnecting the power wires. Undo the screws that hold the motor to the door or to the winder mechanism. You may then be able to just pull the motor away from the rest of the winder mechanism. Watch out for any drive adapter pieces that may fall out when you remove the motor.
If, however, the motor will not come free you will have to remove the rest of the winding mechanism as well. Unbolt the mounting points on the door and free the linkage from the window glass so you can pull it free (see Bodywork 22 and 35).
With the motor out of the door check the gearing for signs of damage or wear. Try reconnecting the power supply and operating the motor to see if it runs smoothly. Erratic or slow operation points to a motor fault so get it checked by an auto-electrician.
Alternatively try dismantling the motor assembly to lubricate the bearings, replacing the brushes if worn, and cleaning the commutator. If the motor is faulty and you cannot service it successfully the only answer is a replacement.
Removing the motor
Tape the window in its closed position to the frame to hold it out of the way. Then disconnect the wiring from the motor and unbolt the motor from the door.
Tape up the window to stop it dropping into the door.
Release the wires from the motor - make a note of where each one fits.
Undo the screws holding the motor to the door.
Limit switches
When refitting the motor and mechanism note that some motors have built-in limit switches to cut out the motor automatically when the window reaches the top or bottom of its travel. You have to make sure this switch is set properly before you refit the motor.
With all motors take care to fasten the motor leads well away from the mechanism, and test for proper operation before you refit the door condensation sheet and trim.

