Vous pourriez avoir besoin de
Do not try to spray in damp, cold or windy conditions. When spraying on the top coats keep the aerosol can moving horizontally, and do not stop or start when you are over the areas being painted. Allow sprayed lines of paint to just overlap, but do not try to make the first top coat cover fully. Have patience - allow the paint 10-15 minutes to partly dry between coats. Six or seven coats may be needed to achieve a good blend of colour. Leave the paint to harden before blending new and old paint at the edges.
Small chips and blemishes are best repaired with a can of touch-in paint and a brush. For larger jobs, use an aerosol spray. If possible, work in a dry, warm, dustless but well ventilated atmosphere.
Metallic paint finishes contain minute flakes of bright metal, possibly covered by a coat of transparent lacquer. Aerosol and brush-on kits for these types of finish are available, but it is almost impossible to reproduce the exact shade because the mixture of paint and flakes is critical, as are the temperature and conditions in which spraying is carried out.
Except for small jobs, or spraying less obvious areas such as front-bumper aprons, it is better to have the work done professionally.
This video course is the best way to learn everything about cars.
Three hours of instruction available right now, and many more hours in production.
- 4K HD with full subtitles
- Complete disassembly of a sports car

Plain finishes are easier to match, but you must obtain the exact shade recommended by the car manufacturer - a slight colour variation is obvious.
Often the code number of the paint is stamped on the car identification plate, and a retouching kit can be bought from a main dealer for the make if not available from an accessory shop. If the code number is not on the plate, quote the car make, model and year, the colour name, and the chassis number (always on the plate).
How to spray aerosol paint
Some aerosols contain solvents which attack and crinkle existing paint. Always test an aerosol on a hidden area of paintwork as a check.
If the paint crinkles do not go ahead with painting the car, have the repair done by a professional paint-sprayer.
Runs
If the paint starts to run you are spraying the area too much, or from too close a distance. Move the aerosol back a little and avoid concentrating on one area.
Orange peel
If the paint surface has a texture which looks like orange peel, you have sprayed on too much paint without letting it dry between passes.
Lifting
Instead of laying flat and sticking to the surface, the paint may crinkle and break away in uneven patches. The cause is probably dirt, grease or polishing wax left on the surface.
Fish eyes
Circular patches, called fish eyes, where the paint does not flow over the painted surface, but leaves thing, patchy areas, are usually due to specks of polish or moisture on the surface.
Before spraying shake the can hard for at least three minutes after the agitator balls inside begin to rattle.
Practise on a piece of metal before you begin spraying in earnest. Try a brief spray from a distance of about 12 in. (300 mm) and look at the results.
If there are specks in the paint which do not join up, the spray is too far away and will have a rough finish when dry. If the paint drips and runs, the spray is being held too close.
At the right distance the result should be a smooth, glossy coat without runs.
After spraying, always clear the jet by turning the can upside-down and pushing the button for two seconds or until the jet blows clear. Otherwise the valve and jet will become clogged.
Preparing the surface
Before masking an area for painting, make sure it is free of grease and dirt. Lightly rub the area with fine-grade wet-and-dry paper and rinse thoroughly with water and a clean cloth. Let the surface dry out before masking.
After dealing with any rust or dents (See Patching rust holes), remove grease and wax from the surrounding paintwork, using a cloth moistened with white spirit.
Take the gloss off the paintwork with 600-grit wet-and-dry paper used wet. Rinse with plenty of clean water, and wipe dry with a chamois leather.
Masking the area
Use masking tape to cover a grille, name plate or any other small item attached to a panel you are spraying.
Remove all the badges and trim if you can. Badges may have push-on steel or plastic clips holding them on behind the panel. You can usually prise the clips loose with a screwdriver.
Some badges are simply pushed into plastic sockets and can be pulled off. A few are fixed by nuts behind the panel. Trim strips are generally sprung over a row of clips or studs. Some trim and badges are glued on.
Use plenty of paper and masking tape when masking off the area you are about to spray. Leave a large overlap of paper on the surrounding bodywork, to guard against any spray drifting on to it. Protect the wheels if necessary.
Use masking tape to cover a grille, name plate or any other small item attached to a panel you are spraying.
Cover any you cannot remove with masking tape, exactly fitted along the edge. Wrap projecting items, such as mirrors, aerial, door handles and bumpers, with paper taped in place.
Try to make the boundaries of the new paint at panel edges, trim strips or other clear lines.
Use masking tape and paper to protect light clusters and other fittings from paint spray.
Lay a double sheet of paper on the roof, and stick a strip of 1 in. (25 mm) wide tape along one edge and overlapping it. Peel it off and stick the tape along part of the boundary tape. Repeat until the whole boundary is well masked. Remember that spray drifts through the smallest gap.
Lay paper on the roof and fix masking tape half on, half off, the paper's edge. The paper can then be transferred to the panel you are going to spray.
Use masking tape to make an accurate spray line. Tape newspaper or brown paper sheets over surrounding bodywork or glass to protect it.
Priming, spraying the top coat and finishing the surface
Shake the aerosol paint can hard and long to mix the primer paint thoroughly - follow the instructions on the can. Apply a coat of paint to the damaged area, but do not go over the edge on to the surrounding paintwork at this stage. Let it dry, then put on another coat, moving the spray in longer, horizontal sweeps to cover the whole area.
Shake the can of aerosol primer hard and long. It is thicker than top coat, but easier to spray on.
Spray a thin coat on to the repaired area only - not right up to the boundary. Let it dry for a few minutes, then apply another thin coat, and go on until the repair is evenly coated and the primer blends into the sound paintwork.
Let the primer dry completely, then remove any blemishes by lightly rubbing with 600-grit wet-and-dry paper, used wet.
In the same way, remove primer from the existing paint near the masking tape, being careful not to rub through the paint. If you expose any bare metal, re-prime it and rub down again.
To spray the top coat, shake the aerosol and hold it perfectly upright. Push off the plastic cap protecting the spray button. Point it at a piece of masking paper in case it splutters when you push the button.
As soon as the spray has stabilised to a fine jet, spray a horizontal line across the top of the repair keeping the button fully depressed and moving slowly and steadily. Release the button.
Repeat slightly lower down, so that the second line just overlaps the first. Continue until the whole area is covered with a thin layer.
Do not try to spray in damp, cold or windy conditions. When spraying on the top coats keep the aerosol can moving horizontally, and do not stop or start when you are over the areas being painted. Allow sprayed lines of paint to just overlap, but do not try to make the first top coat cover fully. Have patience - allow the paint 10-15 minutes to partly dry between coats. Six or seven coats may be needed to achieve a good blend of colour. Leave the paint to harden before blending new and old paint at the edges.
Do not try to make the first coat fully cover, or it will certainly run. And do not stop or start spraying on the area being painted. Wait a few minutes before applying the next coat to let it partly dry.
Apply a second coat, and go on in the same manner until you are satisfied.
As you spray on more coats, the paint will begin to blend with the existing paintwork. It may take six or more coats to give a good depth of colour.
If the paint runs, let it dry completely - wait at least an hour on a hot day.
Rub down with 400-grit wet-and-dry paper, used wet, until the surface is flat again. Dry off the water and continue painting.
Let the paint become touch dry before removing the masking tape. Pull it away from the new paint at an outward angle.
Let the last coat become touch dry, then pull off the masking tape at an outward angle to avoid lifting off the edge of the new paint.
Leave the new paint to harden for a day or two, then blend in the edge by rubbing it gently with a damp cloth primed with a mild cutting compound - available from accessory shops.
If the paint runs, let it dry off thoroughly before trying to rub down the run with wet-and-dry paper. Drying may take several hours, but it is important to let the paint harden thoroughly. Attempting to rub down soft paint will ruin the finish.
If the new paint is dull, rub all over but not too hard or you may go through to the primer coat.
Leave the new paint to weather for six weeks before wax polishing it, which should bring it to full gloss.
When the paint has fully hardened prime a damp cloth with a proprietary cutting or polishing compound, and use it to blend the newly sprayed area with the old, take care not to rub through the relatively soft new paint to the primer coat below.
Brush-painting a small area
Touch in small chips with a brush, using a can of touch-in paint. Or spray a small amount of paint from an aerosol into the can lid, and dip the brush in that. Tins of touch-in paint have a brush in the lid, but an artists brush is preferable.
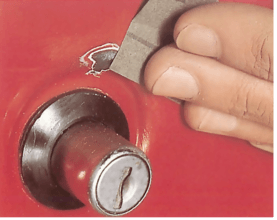
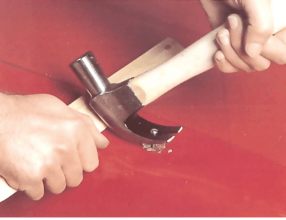
Before carrying out a small paint repair, always remove any loose or cracked paint with a small knife blade. Hold the blade flat to prise off cracked paint.
Shake the can of paint thoroughly. Remove the screw-top and stir the paint with a piece of wire. Try not to use the rather basic brush fitted in the screw-top. Use an artists brush - it can be cleaned later with cellulose thinners.
Apply the paint quickly but not thickly, with the minimum of brush strokes. Overlap the sound paintwork by about 6mm.
Let the paint dry, then apply a second light coat.
Too heavy use of the brush risks stirring up the layers already painted and spoiling the surface finish.
Let the paint dry for at least 24 hours, then polish it gently with a mild cutting compound - not a heavy paste one - to blend the edges into the original paintwork.
