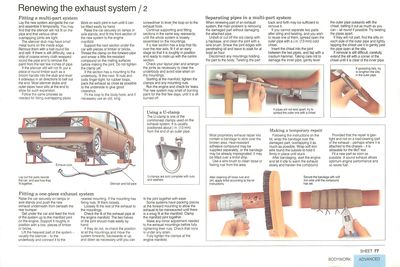
Fitting a multi-part system
Lay out the parts beside the car, and see how they fit together.
Lay the new system alongside the car and assemble it temporarily. You may find that the silencer will not fit on the pipe and that various other overlapping joints are tight.
The silencer stub may have small metal burrs on the inside edge. Remove them with a half-round file and refit. If there is still difficulty, use a strip of coarse emery cloth wrapped round the pipe end to remove the paint from the last few inches of pipe.
This video course is the best way to learn everything about cars.
Three hours of instruction available right now, and many more hours in production.
- 4K HD with full subtitles
- Complete disassembly of a sports car

If the silencer still will not fit, put a piece of round timber such as a broom handle into the stub and lever it sideways in all directions to bell out the end. Most silencer stubs and outer pipes have slits at the end to allow for such expansion.
Follow the same process as needed for fitting overlapping pipes.
Work on each joint in turn until it can be fitted easily by hand.
Raise the car securely on ramps or axle stands, and fit the front section of the new system to the engine manifold.
Support the next section under the car with pieces of timber or bricks. Thread the clamp on the forward pipe and smear a little fire-resistant compound on the mating surfaces before making the joint. Do not tighten the clamp yet.
Using a U-clamp
The U-clamp is one of the commonest clamps used on the exhaust system. It is usually positioned about 10mm from the end of an outer pipe. U-clamps are sold complete with nuts and washers.
If the section has a mounting to the underbody, fit this next: fit nuts and bolts finger-tight; for rubber loops, pack the exhaust as close as possible to the underside to give good clearance.
Fit the loop to the body hook, and if necessary use an old, long screwdriver to lever the loop on to the exhaust hook.
Continue supporting and fitting sections in the same way rearwards until the whole system is loosely assembled on the mountings.
If a rear section has a loop that fits over the rear axle, fit it at an early stage so that it is roughly in position and ready to mate up with the centre section.
Check your layout plan and arrange the joints as necessary to clear the underbody and avoid side strain on the mountings.
Starting at the manifold, tighten the clamps and any mounting nuts.
Run the engine and check for leaks. The new system may smell of burning paint for the first few days, until it is all burned off.
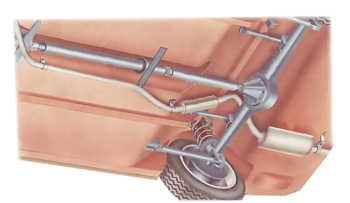
Fitting a one-piece exhaust system
Raise the car securely on ramps or axle stands and push the new exhaust underneath from beneath the rear bumper.
Get under the car and feed the front of the system up to the manifold joint on the engine. Support it roughly in position with a box, pieces of timber or bricks.
Lift the heaviest part of the system usually the silencer - to the underbody and connect it to the nearest mounting. If the mounting has fixing nuts, fit them loosely.
Loosely fit the rest of the exhaust to the mountings.
Check the fit of the exhaust pipe at the engine manifold. The two halves of the joint should mate easily by hand.
If they do not, re-check the position at all the mountings and move the system forwards, backwards or up and down as necessary until you can fit the joint together with ease.
Some systems have packing pieces at the forward mounting to allow the exhaust to be manoeuvred until there is a snug fit at the manifold. Clamp the manifold joint together.
Make any minor adjustment needed to the exhaust mountings before fully tightening their nuts. Check that none is under any strain.
Fully tighten the clamps at the engine manifold.
Separating pipes in a multi-part system
If pipes will not twist apart, try to spread the outer one with a chisel.
When renewing part of an exhaust system, the main problem is removing the damaged part without damaging the attached pipe.
Unbolt or cut off the old clamp with a hacksaw, and clean the joint with a wire brush. Smear the joint edges with penetrating oil and leave to soak for at least an hour.
Disconnect any mountings holding the part to the body. Twisting the part back and forth may be sufficient to remove it.
If spreading fails, try to lengthen the slits in the outer pipe.
If you cannot separate two parts after oiling and twisting, and you wish to reuse one of them, spread open the outer pipe with a 1/2 in. (13 mm) cold chisel.
Insert the chisel into the joint between the two pipes, and tap with a medium hammer. Taking care not to damage the inner pipe, gently lever the outer pipe outwards with the chisel, belling it out as much as you can - all round if possible. Try twisting the pipes apart.
If they will not part, find the slits on each side of the outer pipe and lightly tapping the chisel use it to gently peel the pipe open at the slits.
If removal is still difficult, carefully extend the slit with a corner of the chisel until it is clear of the inner pipe.
How to make a temporary exhaust repair
After cleaning off loose rust and dirt, apply tinfoil according to the kit instructions.
Most proprietary exhaust repair kits contain a bandage to stick over the broken area. Heat-resistant adhesive compound my be supplied separately, or the bandage may be already impregnated; it may be fitted over a tinfoil strip.
Use a wire brush to clean loose or flaking rust from the area.
Following the instructions on the kit, wrap the bandage over the damaged part, overlapping it as much as possible. Wrap soft iron wire round the outside to hold it firmly in place until stuck.
Secure the bandage with soft iron wire until the compound has set.
After bandaging, start the engine and let it idle to warm the exhaust slowly and harden the compound.
Provided that the repair is gas-tight and not on a load-bearing part of the exhaust - perhaps where it is attached to the chassis - it is allowable for the MOT test.
Fit a new part as soon as possible. A sound exhaust allows optimum engine performance and so saves fuel.
