
Vous pourriez avoir besoin de
Use a drill and disc or flap wheel to sand down to bare metal for about 25mm in and around the dent.
The best way to treat a dent is to raise the metal almost to its original level, then to level the surface with a thin layer of plastic body filler. You can do this with most of the plastic filler kits available.
There are two types of filler — powder which you mix with resin and sometimes with hardener as well; and ready-mixed paste to which you add hardener.
The paste is easier to use although a little more expensive than resin and powder. With either, be sure to follow the maker's instructions carefully.
This video course is the best way to learn everything about cars.
Three hours of instruction available right now, and many more hours in production.
- 4K HD with full subtitles
- Complete disassembly of a sports car

Work in a dry, warm atmosphere, at a temperature of 60°F (16°C) or above. If it is colder, use an electric heater or hair dryer to help the filler to cure (harden).
Preparing the surface
Hold a flat piece of wood over the outside of the dent. Use the rounded end of a ball-pein hammer to gently tap out the dent from the inside.
Make the dent as shallow as possible. If you can reach behind the panel, push it out by hand or, by gentle use of a ball-pein hammer with a piece of wood held against the outside. Leave the dent slightly below the surrounding surface.
To pull out a large dent, screw a self-tapping screw in the centre and use a claw hammer under the head of the screw and lever against a piece of wood.
If you cannot reach behind the panel, drill a small hole in the deepest part of the dent. Screw in a self-tapping screw, but leave it protruding about 1/2 in. (13 mm).
Small dents can often be pulled out more easily, depending on their location. Drill a small hole in the centre of the dent and screw a self tapping screw in, but leave the head and a few threads exposed. Grip the head with self-locking grips and pull outwards.
Hook a claw hammer under the screw head. Pull the hammer to raise the dent. For a harder pull, lever with the hammer head resting on a broad piece of wood. For small dents, grip the screw with self-locking grips and pull to raise the dent.
Applying the filler
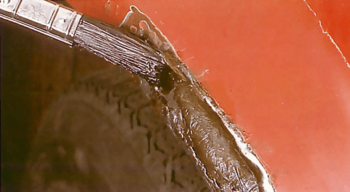
Use a drill and disc or flap wheel to sand down to bare metal for about 25mm in and around the dent.
Use an electric drill with a wire brush, abrasive disc or flap wheel to remove all the paint down to bare metal in the dent and for about 1 in. (25mm) around it. Score the metal with a spike to help the filler key into it.
Mix the filler according to the instructions. Try not to mix more than you will need. Apply it quickly once you have added the hardener, using the plastic spatula supplied or a flexible wallpaper scraper.
Once the surface has been prepared, mix up sufficient body filler and smooth over with the plastic spatula.
Spread it firmly and evenly into the dent so that the surface is slightly higher than the surrounding bodywork.
Leave it to harden completely. The hardening time will depend on the amount of hardener added and the air temperature. In a warm atmosphere and mixed to the manufacturer's instructions, most fillers will set within 30 minutes. Do not try to sand it while it is still soft: that might pull it away from the metal.
Roughly shape the hardened surface with a rasp, then change to a hard rubber sanding block wrapped with a sheet of coarse wet-and-dry abrasive paper.
Use a rasp or a multi-bladed plane, such as a Surform, or an electric disc sander to roughly shape the surface - but still leave it a little higher than the surrounding bodywork.
Wrap coarse (80 or 100 grit) wetand-dry abrasive paper around a hard rubber sanding block.
Dip it in water, and start shaping the filler: take your time. As it nears the right shape, change in stages to medium (240 grit) and the finer (320 grit) paper.
Use fine (400 grit) paper for the last stages. Always keep the paper well rinsed and wet.
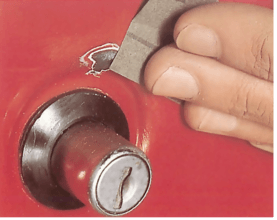
Fill small dents and scratches with stopper, and lightly rub down.
When the shape seems right and smooth, wipe away dust with a cloth, let the repaired area dry, and inspect the surface. Run your fingers lightly along the edge of the filled area to feel for a ridge which will show when painted.
Use progressively finer grades of wet-and-dry paper to get a smooth finish.
Fill any air holes or scratches with a little stopper, and let it harden. Rub down with very wet 400-grit paper, then clean the whole area with a dry cloth.
Allow plenty of time for the area to dry out completely before priming and painting (See Painting a car).

