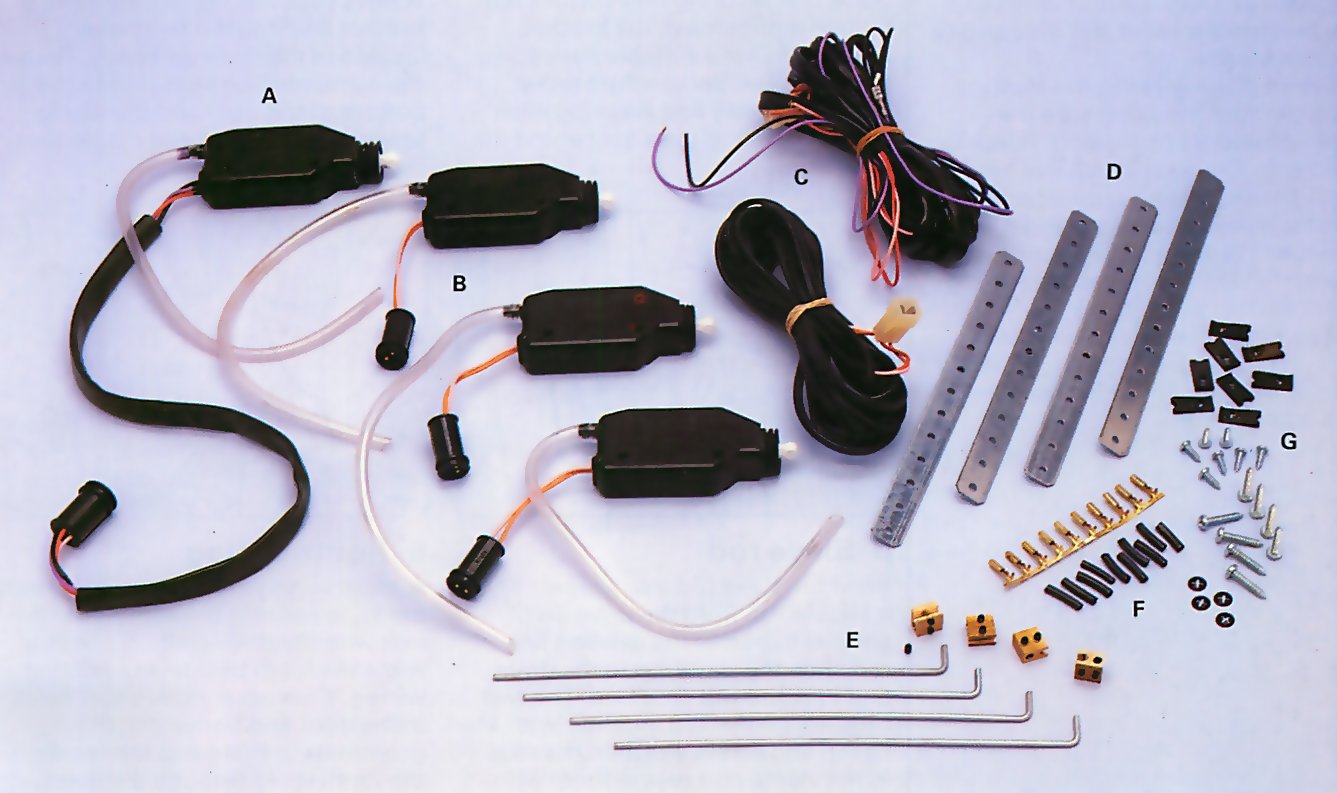
Central locking kit
These kits can be fitted to either two-or four-door cars. The kit shown below is a four-door kit and consists of:
A - Master drive unit
B - Other drive units
C - Wiring loom
D - Mounting brackets
E - Link rods and clamps
F - Electrical connectors and insulators
G - Securing screws, clips and washers
Car theft or car break-ins are always a worry to the motorist and it is wise to take every precaution against them that you can.
Central door locking is a feature that provides both convenience and added security to anyone who regularly drives around with passengers in their car.
Security
This video course is the best way to learn everything about cars.
Three hours of instruction available right now, and many more hours in production.
- 4K HD with full subtitles
- Complete disassembly of a sports car

The most obvious advantage of a central door locking system is that it provides a quick and easy way of locking all the doors of your car together just by operating the driver's lock. The security gain is that there is no danger of leaving a door unlocked. You can also easily lock the rear doors to keep small children inside the car.
To convert your car to central door locking you need a kit, which you can readily buy from a car accessory shop. It consists of electrically operated drive units that you mount inside the doors, along with all the wiring, brackets and link rods that you need for fitting it to your car.
A kit can be used on a two- or four-door car, although the benefits of fitting one to a four-door car are obviously greater. It can also be used on almost any model of car, but you should check with your dealer first in case your car is unsuitable. It is also a good idea to shop around before you buy.
Operation
When the driver's door lock is operated it moves a switch in the master drive unit. The master unit then sends a signal to the drive units which move the link rods and lock or unlock the other doors.
Remote control
Some kits are also supplied with a remote control. This allows you to lock the car from the outside with a hand-held unit. This has the advantage that, if the locks freeze in cold weather, you may still be able to unlock the door using the remote control.
1. Remove trim
The door trim panels should be removed first to gain access to the inside. Remove all the handles and winders before releasing the panel securing clips and lifting the panel away (see Bodywork 8). Carefully remove the condensation sheet fitted behind the trim.
2. Fitting position
Each drive unit should be mounted on the inside of the inner door skin so that its own slave rod can join to the link rod between the door locking button and lock assembly. If you can, mount it across one of the holes in the skin to make fitting easier. The unit should not obstruct the glass or opening mechanism.
3. Mark and drill
Offer up the mounting bracket to the inner door skin. Mark the position of the screw securing holes with a felt-tip pen then remove the bracket. Using a drill of a suitable size, drill out the holes. Secure the bracket with the screws and securing clips provided, fitting the clips behind the door skin.
4. Fit drive unit
Secure the drive unit to the bracket using the screws provided. The screws pass through the mounting bracket and into the two holes located in the drive unit body. Route the condensation vent pipe to the bottom of the door and the wiring towards the hinged end of the door ready to connect up later.
5. Slave rod
Bend the slave rod into shape. It should run from the drive unit, parallel to part of the existing link rod. Join the slave rod to the drive unit with the clip provided. The two rods are connected together with a clamp and screw. Position the rods in the clamp and secure them with the grub screws.
6. Route wiring
A small wiring loom is provided with the kit to connect the master control unit with the drive units. If possible route the loom beside any existing wiring. If necessary drill small holes in the door and bodywork, fit grommets to them and then route the loom wires through the holes into the doors.
Wiring central locking
Central locking wiring diagram
Each drive unit has a small length of wiring attached to it which terminates in a multi-plug. The master drive unit is identified by having two extra wires connected to it. These are the feed and earth return for the entire door lock system.
Start by disconnecting the battery to avoid any short circuits. Join the terminal connectors to the ends of all the wires leading to the drive units. Remember there are four wires to the master drive unit and only two to the drive units.
Connect the wires to the multi-plug terminals making sure the wiring colours correspond. Route the feed wire to a permanent live feed such as the battery terminal or the battery side of the fuse box. Fit an in-line fuse (16 amp) to this wire. Run the earth wire to a suitable earthing point and secure it firmly.
Reconnect the battery terminal and test the lock is working correctly. Finally refit the door trim panel and window controls.
