Vous pourriez avoir besoin de
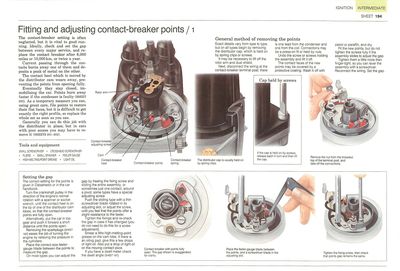
The contact-breaker setting is often neglected, but it is vital to good running. Ideally, check and set the gap, between every major service, and replace the contact breaker after 6,000 miles or 10,000 km, or twice a year.
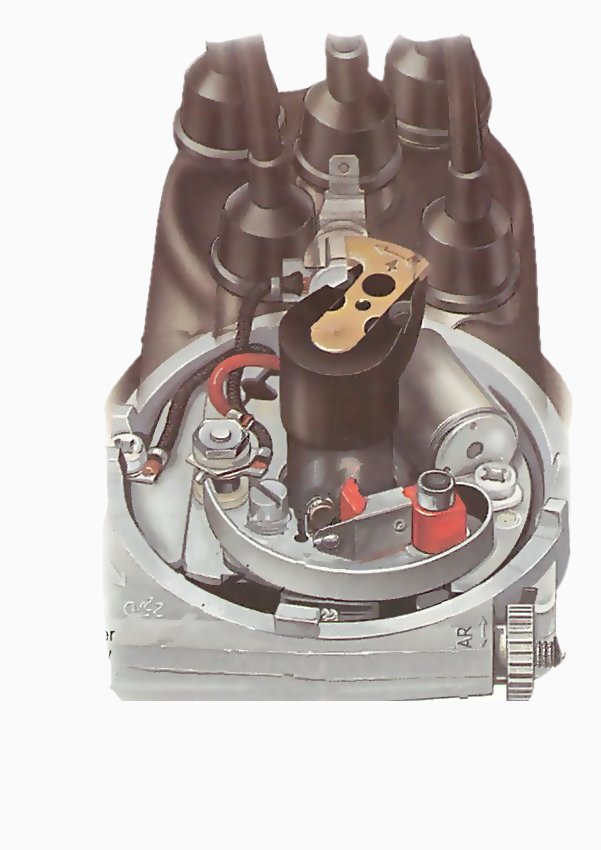
Current passing through the contacts burns away one of them and deposits a peak of metal on the other.
The contact heel which is moved by the distributor cam wears away, preventing the points from opening fully.
This video course is the best way to learn everything about cars.
Three hours of instruction available right now, and many more hours in production.
- 4K HD with full subtitles
- Complete disassembly of a sports car

Eventually they stay closed, immobilising the car. Points burn away faster if the condenser is faulty (See Checking the low-tension circuit). As a temporary measure you can, using great care, file points to restore their flat faces, but it is difficult to get exactly the right profile, so replace the whole set as soon as you can.
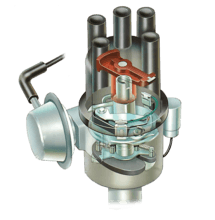
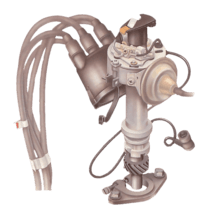
Generally you can do this job with the distributor in place; but in cars with poor access you may have to remove it (See Removing and refitting the distributor).
General Method of removing the points
The distributor cap is usually held on by spring clips.
Exact details vary from type to type; but on all types begin by removing the distributor cap, which is held on by spring clips or screws.
It may be necessary to lift off the rotor arm and dust shield.
Cap held by screws
If the cap is held on by screws, release each in turn and then lift the cap.
Next, disconnect the wiring at the contact-breaker terminal post: there is one lead from the condenser and one from the coil. Connections may be a press-on fit or held by nuts. Undo the screw or screws holding the assembly and lift it off.
Remove the nut from the threaded top of the terminal post, and take off the connections.
The contact faces of the new points may be covered by a protective coating. Wash it off with petrol or paraffin, and dry.
Fit the new points, but do not tighten the screws fully if the assembly slides to adjust the gap. Tighten them a little more than finger-tight, so you can lever the assembly with a screwdriver. Reconnect the wiring. Set the gap.
Setting the contact gap
Contact breaker with points fully open. The gap shown is exaggerated for clarity.
The correct setting for the points is given in the car handbook or workshop manual.
Turn the crankshaft pulley in the direction of the engines normal rotation with a spanner or socket wrench, until the contact heel is on the tip of one of the distributor cam lobes, so that the contact-breaker points are fully open.
Alternatively, put the car in top gear and push it forwards a short distance until the point open.
Removing the sparkplugs eases the job of turning the engine by relieving the pressure in the cylinders.
Place the feeler gauge blade between the points, and a screwdriver blade in the adjusting slots.
Place the correct size feeler-gauge blade between the points to measure the gap.
On most types you can adjust the gap by freeing the fixing screw and sliding the entire assembly, or sometimes just one contact, around a pivot; some types have a special adjusting screw.
Push the sliding type with a thin screwdriver blade rotating in its adjusting slot, or just adjust the screw, until you feel that the points offer a slight resistance to the feeler.
Tighten the fixings and re-check the gap in case it has changed (you do not need to do this for a screw adjustment)
Smear a little high-melting-point grease on the cam lobe. If there is an oiling pa, give this a few drops of light oil. Also put a drop of light oil on the moving contact pivot.
Tighten the fixing screw, then check that points gap remains the same.
If you have a dwell meter check the dwell angle.
Contact breaker with points fully open. The gap shown is exaggerated for clarity.
Place the feeler gauge blade between the points, and a screwdriver blade in the adjusting slots.
Tighten the fixing screw, then check that points gap remains the same.
Contact breaker types
Lucas — old and new type
Ease the spring pressure with a screwdriver and remove the terminal plate.
Remove the moving contact assembly, which is in one piece.
On the old type, unscrew the nut, at the free end of the spring, using pliers or a small spanner.
Lift off the top nylon insulator and the two terminals underneath it, noting the sequence in which the various parts are positioned - particularly the insulating washers.
Remove the single screw next to the terminal post. Lift off the assembly.
Fit the new assembly in exactly the reverse order.
Set the gap by levering with a screwdriver blade in the adjusting slot.
On the newer one-piece type the terminal plate simply lifts off.
First gently take some of the pressure off the spring then lift out the terminal plate with the leads still attached to it.
Fit the one-piece contact over the pivot post and replace the low-tension (LT) leads over the insulated base of the contact set. Secure with the plastic nut.
Marelli
With the terminal lead detached, ease off the circlip on the contact pivot post.
Adjust the gap by turning a screwdriver in the slot in the centre of the assembly.
Remove the nut from the terminal post on the side of the distributor, and the main fixing screw of the assembly.
Pull the plastic terminal block up and off its mounting bracket, and detach the free end of the spring.
Remove the circlip over the contact pivot and lift off the various parts, noting the order in which they are fitted.
When reassembling remember to re-attach the lead from the condenser.
Bosch
On some Bosch distributors, a plate held by screws covers the contact assembly.
Disconnect the lead from the terminal on the side of the unit.
Gently press the spring, free it from the top on the lower part of the assembly and lift off complete with moving contact.
Disconnect the lead from the push-on terminal at the side of the unit.
Gently ease the spring pressure and remove the spring and moving contact.
Fit the new moving contact after fitting the fixed contact plate.
Insert a screwdriver in the slot at the side of the fixed contact plate and turn it to the left or right to set the gap.
Remove the screw retaining the fixed contact and lift off the contact.
When reassembling, fit the new fixed contact point over the peg on the baseplate and refit the screw. Fit the LT lead to the peg on the plastic clip, and fit the new moving point.
Nippon Denso
Slacken the terminal nuts and lift the lead.
Remove the fixing screw and gently prise out the assembly.
The gap is adjusted by swinging the assembly around the moving contact pivot point.
Loosen the two nuts on the terminal on the side of the distributor and detach the lead. Remove the two main fixing screws.
Lift off the old assembly, fit the new one and reconnect the lead. The gap is adjusted by swinging the assembly around the moving contact pivot point.
Mitsubishi
Remove the two crosshead screws holding the contact assembly after detaching the earth lead.
Set the gap by rotating the V-notched adjuster with a screwdriver.
Loosen the screw holding the earthing lead from the contact set to the distributor body, then pull the lead clear. Remove the two fixing screws with their washers and spring washers. Lift off the assembly.
When fitting the new one, note the small lug on the bottom which fits into a hole in the distributor. Refit the earthing lead to the furthest away of the two fixing screws. Refit the condenser lead and tighten its screw.
Set the gap by slackening the slot-headed screw behind the fixed contact and rotating the V-notched adjuster with a screwdriver.
AC Delco
Release the terminals by gently easing the contact-breaker spring pressure.
Move the fixed contact plate to set the gap by inserting a screwdriver into the slot.
There are two types: one has the normal layout, but the other has the centrifugal advance weights above the points.
On the first type, press the spring of the moving point to release the terminals, and lift them out.
Loosen the screws holding the rotor arm.
Slide out the terminal leads while easing the spring pressure.
Remove the fixing screw, lift off the assembly and fit the new one.
On the second type, loosen two screws to free the rotor arm.
Hold the arm meanwhile, then lift off complete with the screws so as not to drop them - this allows access to the contact set.
Press the spring of the moving point with a screwdriver blade to release the leads, then slide them off: one upwards and the other sideways.
Remove the fixing screws and spring washers to release the assembly: you may need to turn the engine to move the weights out of the way.
There is a slot for levering with a screwdriver to adjust the gap.
Motorcraft
Remove the two fixing screws after disconnecting the leads.
Move the fixed contact plate to set the gap by turning a screwdriver in the slot.
Disconnect the two leads by releasing the crosshead screw at the contact-breaker terminal.
Remove the two screws holding the contact-breaker set to the distributor baseplate and lift off the old assembly.
Fit the new one, re-attach the leads and retighten their screw.
Ducellier
Loosen the terminal nut on the side of the distributor body, and release the slotted end of the moving contact spring.
Remove the small spring clip across the terminal and pivot posts and lift off the washers.
Slacken the nut on the outside of the distributor to release the moving contact spring.
Use the blade of a thin screwdriver to open up and remove the spring clip across the pivot and terminal posts.
Lift the moving contact off the pivot post. Release the fixed contact securing screw and lift off the contact.
Screw on the new fixed contact; do not tighten its screw fully. Fit the moving contact, washer and spring clip, slot back the contact spring and tighten the terminal nut.
Set the gap by moving the fixed contact plate with a thin screwdriver. Lubricate the cam spindle.
Lift the moving contact off the pivot post.
Set the gap by inserting a thin screwdriver in the fixed contact-plate slot and moving the plate.

