Vous pourriez avoir besoin de
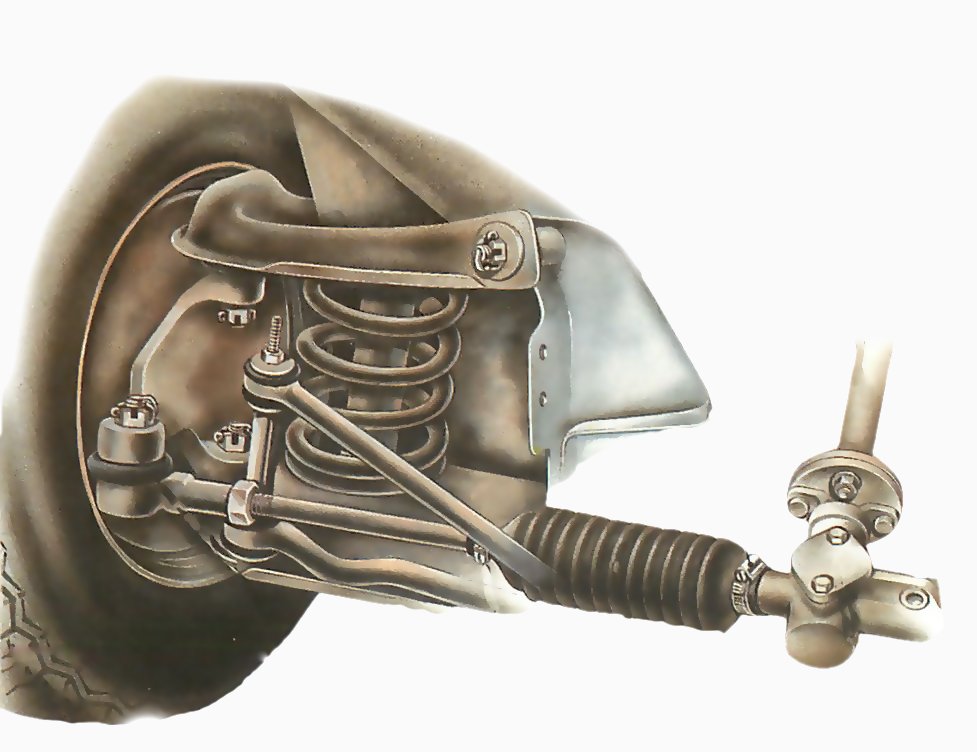
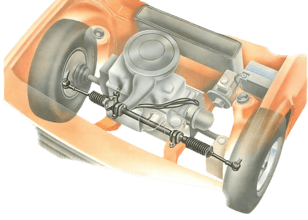
A steering rack
Points to inspect when checking a steering-rack. There are also ball joints and gaiters on the other side of the car.
Part of a steering rack check involves raising the front of the car but retaining its weight on its wheels. You must also get underneath the car while a helper turns the wheels to and fro. Unless you can gain access to a proper inspection pit you may have to use wheel ramps. Make sure they are resting on a level surface and directly under the wheels.
Apply the handbrake firmly, chock behind the rear wheels and put a rearwheel-drive car in gear (park for an automatic).
Take precautions also when the car is raised with its wheels off the ground. In that case use axle stands under frame members - do not work under a car raised on jacks.
This video course is the best way to learn everything about cars.
Three hours of instruction available right now, and many more hours in production.
- 4K HD with full subtitles
- Complete disassembly of a sports car

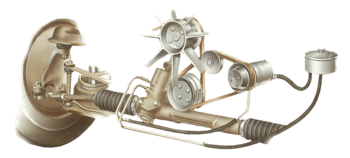
The steering rack is filled with oil or grease which normally does not need renewing.
However, the rack can suffer from oil leaks, from grit getting in and damaging it, and from simple wear. Check it, together with the rest of the steering system (See Checking steering swivel pins).
If the steering feels stiff, it may be because the rack has lost much of its oil. Renew the oil (See Lubricating steering swivel joints) and clean the whole rack and gaiters.
Drive the car a few miles. Note whether topping up with oil has temporarily cured the stiffness. If it has, look for oil runs around the rack.
Cleaning the rack may also reveal other damage, such as cracks, in which case the rack should be replaced.
You can replace gaiters yourself (See Replacing steering-rack gaiters), provided that no grit has got into the rack and damaged it. Inspect the rack teeth when the steering is turned on full lock. Almost any other rack fault must be attended to by a garage.
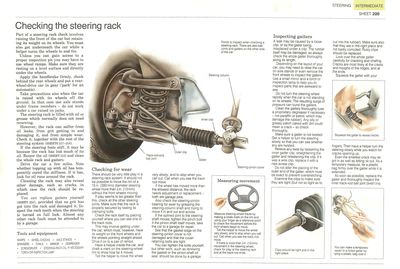
Checking for wear
Measuring movement
Measure steering-wheel travel by making a chalk mark on the rim and using your finger as a reference point to check the movement before the front wheels begin to move.
Tell the helper to move the wheel very slowly, and to stop when you call out. Call when you see the track rod move.
If there is more than 1/2in (13mm) movement in the steering wheel, check for play at the steering rack and at the track-rod ends.
There should be very little play in a steering rack system. It should not be possible to move the rim of a 15in (380mm) diameter steering wheel more than 1/2in (13mm) without the front wheels moving.
If play seems to be greater than this, check all the other steering joints. Make sure that the rack is properly secured by testing its clamping bolts.
Check the rack itself by placing yourself where you can see one of the track rods.
This may involve getting under the car, which must, however, have its weight on the front wheels and the wheels pointing straight ahead. Drive it on to a pair of ramps.
Have a helper inside the car and chalk a mark on the steering-wheel rim to show how far it moves.
Tell the helper to move the wheel very slowly, and to stop when you call out. Call when you see the track rod move.
If the wheel has moved more than the allowed distance, the rack needs adjustment or replacement both are garage jobs.
Also check the steering-pinion bearing for wear by grasping the steering-column shaft and trying to move it in and out and across.
If the splined joint to the steering shaft moves, tighten the pinch bolt. If the pinion shaft itself moves, take the car to a garage for repair.
See that the gasket edge on the steering-pinion cover is not damaged and that the cover-retaining bolts are tight.
You can tighten the bolts yourself; but other work, such as renewing the gasket or the pinion-shaft oil seal, should be done by a garage.
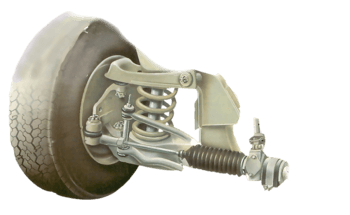
Inspecting gaiters
You can make a temporary repair to a holed gaiter by tying a plastic bag over it.
A leak may be caused by a loose clip, or by the gaiter being misplaced under a clip. The rubber itself may be damaged, so always check the whole gaiter thoroughly along its length.
Depending on the layout of your car, you may need to raise the car on axle stands or even remove the front wheels to inspect the gaiters. Use a small mirror and a torch or inspection lamp to help you to inspect parts that are awkward to see.
Do not turn the steering wheel rapidly when the car is not standing on its wheels. The resulting surge of pressure can burst the gaiters.
Clean the gaiters thoroughly (use a proprietary degreaser if necessary - not paraffin or petrol, which may damage the rubber). Any oily or greasy patch caked with dirt could mean a crack - so check thoroughly.
Make sure a gaiter is not twisted. Get a helper to turn the steering slowly so that you can see whether any are twisted.
Relieve any twist by loosening the inner gaiter clip, straightening the gaiter and refastening the clip. If it was a wire clip, replace it with a new screw clip.
Do not alter the placing of the outer end of the gaiter, which must be exact to prevent overstretching.
Clips should be tight and in the right place.
Examine the clips to make sure they are tight (but not so tight as to cut into the rubber). Make sure also that they are in the right place and not badly corroded. Rusty clips should be replaced.
Look over the whole gaiter carefully for cracking and chafing. Cracks are most likely at the crests and troughs of the ridges, and at the ends.
Squeeze the gaiter with your fingers. Then have a helper turn the steering slowly while you watch for cracks opening up.
Squeeze the gaiter to reveal cracks.
Even the smallest crack may let grit in as well as letting oil out. As a temporary measure, tie a plastic bag firmly over the gaiter while it is extended.
As soon as possible, replace the gaiter and thoroughly inspect the inner track-rod ball joint (See Checking steering joints for wear).
