Vous pourriez avoir besoin de
A sunroof kit
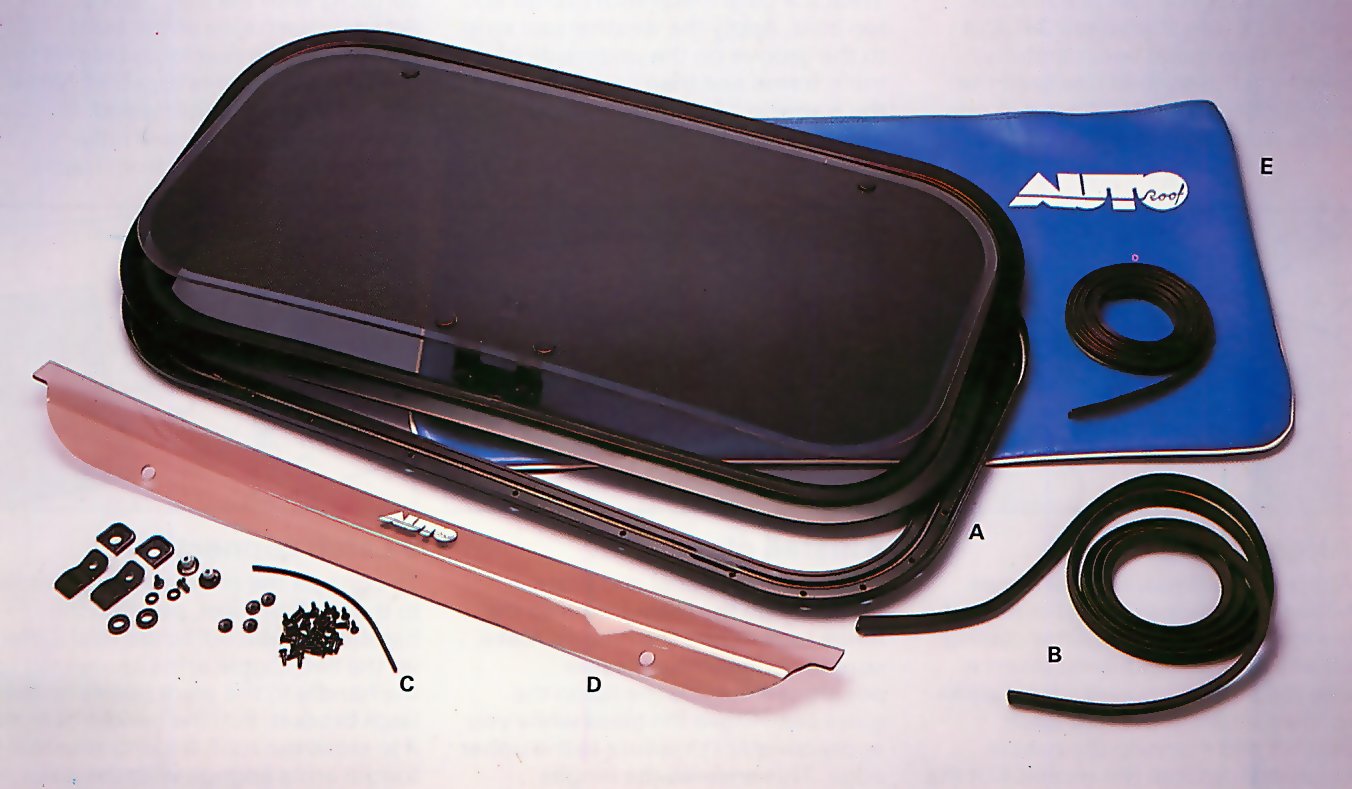
The DIY sunroof kit shown below comes complete with glass and supporting frames (A), weatherseals (B) and all the necessary brackets and screws (C). You can also fit a deflector (D) to the frame when you have removed the glass completely for ventilation. This prevents too much breeze coming into the car. And when you take the glass out you can store it in the stowage bag (E) to protect it.
Fitting a sunroof brings extra fresh air and light inside the car, making driving more of a pleasure as well as considerably increasing the resale value of your car - provided the job is well done.
Manufacturers are increasingly fitting sunroofs to their cars, either as an extra or, on more expensive models, as standard. These factory-fitted sunroofs are built-in with the rest of the car and are often the metal sliding or fold-up canvas type. (See Bodywork 45 and 46 for more details.)
Sliding and fold-up sunroofs can also be fitted as an aftermarket accessory, although they are expensive and generally have to be fitted professionally. Furthermore, the roof structure of some cars prevents these types of sunroofs from being fitted.
This video course is the best way to learn everything about cars.
Three hours of instruction available right now, and many more hours in production.
- 4K HD with full subtitles
- Complete disassembly of a sports car

Tilting glass
One type of sunroof that you can fit yourself, however, is the tilting-glass type. These are hinged at the front and have a handle at the back which allows you to tilt the window open. They are relatively cheap, simple to operate and can be fitted to most makes of car.
This type of sunroof requires no special skills to fit, other than those of an ordinary DIY mechanic, but you do have to be very careful when you mark and cut the roof panel. A mistake here could very easily ruin your car.
Points to check
Before buying a sunroof, always check carefully that the particular sunroof you want to buy will fit your car. There may be problems if, for example, your car has a roof with a pronounced curve or if the roof is a highly stressed part of the body structure.
You can buy aftermarket sunroofs from a car accessory shop or direct from the manufacturers, but the best source is often a specialist sunroof-fitting centre. As well as fitting sunroofs, these centres often sell sunroof kits to the public and offer specialist advice.
1. Positioning
Decide where to fit the sunroof and cover the area with masking tape to protect the paintwork. Place the template supplied with the kit in position and use a sharp instrument to carefully scribe around it on to the masking tape. Make sure the template doesn't move when you do this.
2. Drilling
Use a 4mm drill and make four holes in the roof, each about 5in (12cm) in from the corner of your marked area. Take care not to catch the drill on the headlining. Inert a probe through the drilled holes and pierce holes in the headlining below.
3. Removing headlining
Working inside the car, carefully cut the headlining between the four holes using scissors or a sharp craft knife. Take care not to tear it. Remove any support rails, roof stiffener or insulation materials from the fitting area of the sunroof aperture.
4. Cutting out
Using either a larger drill or a rat-tail file, enlarge one of the four drilled holes so that you can fit a nibbler tool into it (see Bodywork 34). Cut out the roof metal very carefully, following the scribed line until the roof section can be lifted out in one piece. Be careful of sharp edges.
5. Main frame fitting
Remove the masking tape and carefully file down any rough edges. Treat the bare metal with primer and top coat. Apply the weatherseal strip to the groove on the underside of the main frame and then carefully place the frame in position in the roof aperture.
6. Inner frame
Working from inside the car, offer up the inner frame so it lines up correctly with the main frame. Screw in each side of the front hinges and the rear latch bracket to hold the two frames together. Work around the frame fitting and tightening all the screws fully. Remove latch bracket from frame.
7. Headlining
Apply trim adhesive to the recess between the upper main frame and the lower inner frame. After cutting off any excess headlining insert it into the recess, making sure it sticks to the glue. Refit the rear latch bracket and then slip the rubber finishing trim into the recess. Cut the trim to size.
8. Install glass
Take the glass panel and place it vertically on the main frame so the hinge tags fit into the hinges. Make sure the edge of the glass is positioned outside the lip on the glass seal. Close the glass while you apply constant pressure to the upper edge. This ensures the hinges engage fully.
9. Latch connection
To connect the main opening handle to the latch bracket, position the handle at about 90° to the roof. Offer up the two toggle arms connected to the handle to the pivot points on the latch bracket. Pull the handle over as if to close the roof, making sure the toggle arms engage with the pivot points.
