Vous pourriez avoir besoin de
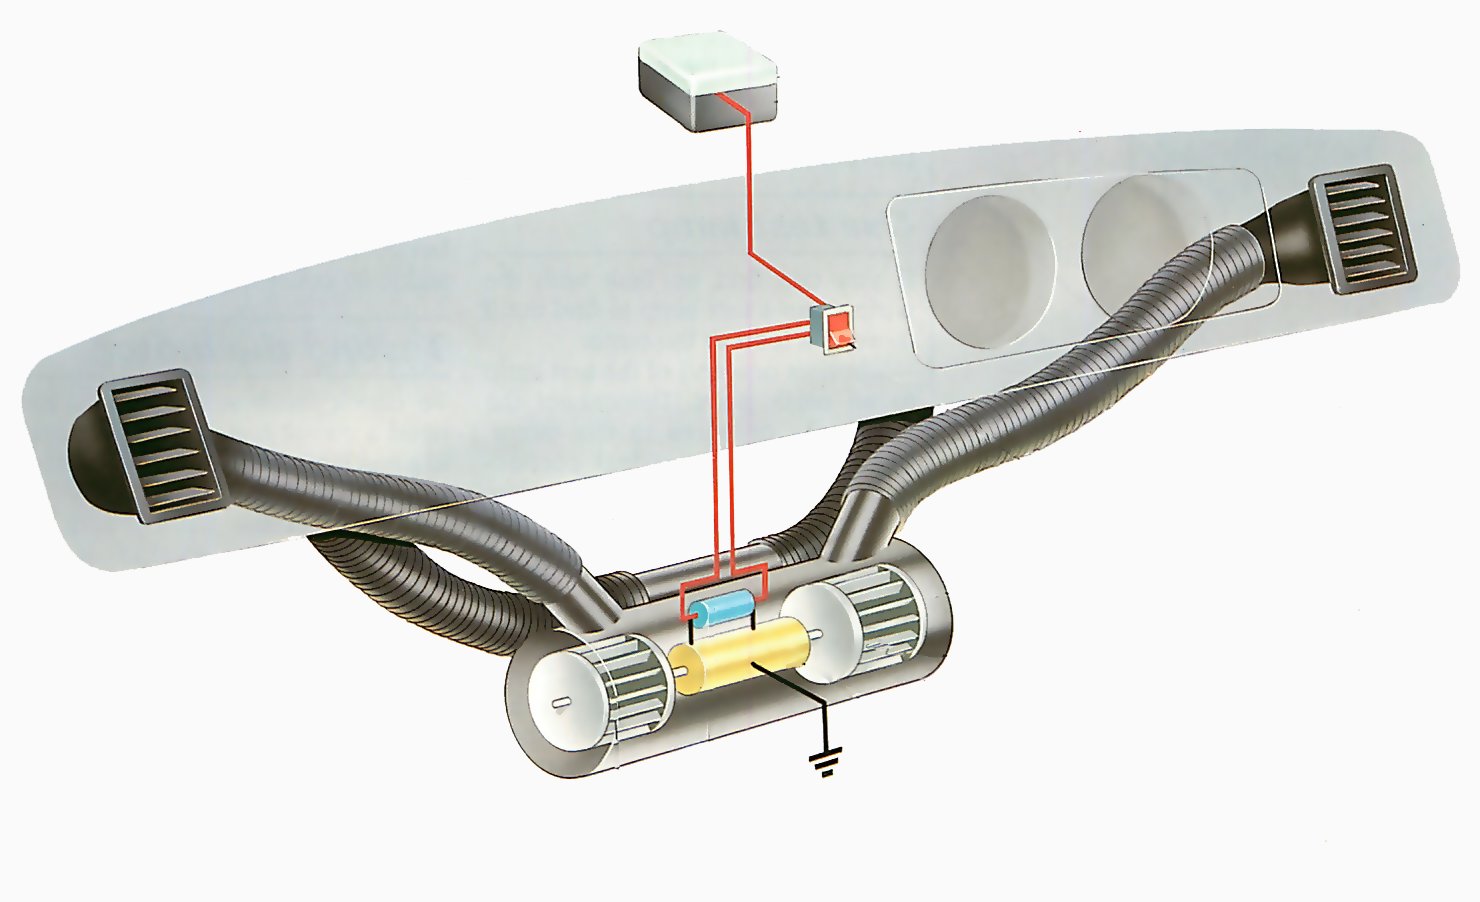
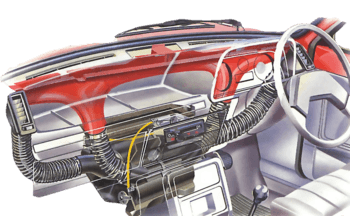
Car heater circuit layout
The heater fan is simply an electric motor mounted inside the heater unit. Current is fed to the motor via a switch on the dash.
If your fan has several speeds, they are usually controlled by a large resistor block mounted piggy-back on the fan motor. For slow speeds the dash switch directs the current to the motor via the resistor block. For top speed the switch bypasses the resistor and applies full current to the motor.
The car's heating system consists essentially of a motor-driven fan to blow warm air from the engine bay to the car's interior.
The system is very simple and rarely goes wrong. The only fault that is likely to develop is that the fan stops working because of a break in the electrical circuit. This circuit consists of a feed wire from the fusebox to the on/off switch on the dashboard or centre console, and another wire from the switch to the heater motor. The motor is usually earthed to the body by a separate wire.
In most cars the heater motor is situated under the centre of the dash, which makes it rather inaccessible. In some cases, however, the motor is under the bonnet at the rear of the bulkhead.
This video course is the best way to learn everything about cars.
Three hours of instruction available right now, and many more hours in production.
- 4K HD with full subtitles
- Complete disassembly of a sports car

The most common cause of any problem is a blown fuse. This is normally in the main fusebox although it may be an in-line fuse wired into the feed of the motor itself. Check in your workshop manual to find the exact position of the fuse. If it protects other circuits and these have stopped working too, then the problem should be solved by fitting a new fuse.
Wiring check
If fitting a new fuse fails to solve the problem, or if the other components controlled by the fuse are working, check for loose, dirty, trapped or disconnected wires.
Find out where the heater wires are situated from your workshop manual wiring diagram. Follow the wires as far as you can, checking each connection.
Earth check
If you find no damaged wires, check the heater motor earth connection. This is usually on the bulkhead and may have become corroded.
Clean away any corrosion on the mating surfaces with wet-or-dry paper and refit the securing nut or screw, making sure it is tight. Cover the connection with vaseline to prevent further corrosion.
Checking a heater fan circuit
Probe the live terminals in the multi-plug.
Probe the output terminal on the switch
Carry out all your tests with the clip of your test lamp earthed.
Turn on the ignition and switch on the fan. Disconnect the motor feed wires (here a multi-connector plug) and probe the terminals. If the lamp lights, current is present and the motor is probably faulty. If the lamp doesn't light, test the switch.
Check for current at the fusebox.
Pull the switch out of the dash and, leaving it switched on, probe the output terminals. If the lamp lights, the wiring between the switch and motor is faulty. If it doesn't, check the switch input terminal in the same way. If the lamp lights, the switch is broken. If it doesn't light, check for current at the fusebox.
Then probe the switch input terminal.
Probe the fuse output terminal with the lamp. If the lamp fails to light, change the fuse and try again. If the lamp lights but the heater still won't work, then the wiring between fusebox and switch is faulty.
Use test lamp
If you can find no fault with the wiring, use a test lamp to find out if there is a feed to the motor.
Connect one end of the test lamp to an earth point. Disconnect the feed wire or wires to the motor. There may be individual connections, or a multi-connector plug. Turn on the ignition and move the motor switch to one of the on positions.
Probe each wire in turn with the test lamp. If the lamp lights, current is reaching that point. Repeat with the heater switch in the other position. If the lamp lights on both wires, the problem is in the motor itself (see below).
If there is no power at the motor, you must check the connections at the switch. Probe the output terminals first, switching from low to high speeds. If the test lamp lights up on the output terminals the wiring between the switch and motor is broken and you may prefer to seek expert advice. If the lamp fails to light, check the input terminal. If this lights the test lamp, the switch is faulty. If the test lamp doesn't illuminate when touching the input terminal, the wiring between the fusebox and switch is faulty, so consult an auto-electrician.
Testing the motor
Resistor check
If the heater motor only works on one speed you should check the resistor. These are normally mounted on the rear of the motor but check with your workshop manual first.
Clip the wire of your circuit tester to one end of the resistor, then probe the other terminals on it. If the tester fails to light replace the resistor.
To check the motor windings you need a circuit tester. This is similar to a test lamp but has its own battery power supply.
Disconnect the battery and the wires connected to the motor, making a note of how they fit. Attach one side of the tester to the motor earth wire and probe each of the feed terminals in turn. If the tester lights on all the terminals, the motor is sound. But if the tester fails to light the motor has blown and will need replacing.
If the motor keeps blowing fuses, it may have become jammed. Sometimes the heater fan gets clogged with debris you need to remove.

