Vous pourriez avoir besoin de
Reversing light switches
There are two main types of reversing light switch.
On a manual gearbox the switch usually screws into the gearbox casing and may have a locknut to hold it in position. This type of switch has two terminals.
On an automatic gearbox the switch is similar in appearance but usually has four terminals instead of two. Two are for the reverse light circuit and two for the inhibitor switch circuit which prevents the car being started in any gear position other than 'N' or 'P'.
Reversing lights are not generally a legal requirement but they are useful. They serve two purposes - to warn other road-users you are about to reverse, and to provide light if you are reversing in the dark.
The circuit is a simple one, consisting of one or two rear light units operated by a switch, so if anything goes wrong it is easy to check. On most cars the switch is mounted on the gearbox and it is operated automatically when reverse gear is selected. If the lights were added after the car was made, the switch may be a manually operated one mounted on the dash.
Blown bulb
This video course is the best way to learn everything about cars.
Three hours of instruction available right now, and many more hours in production.
- 4K HD with full subtitles
- Complete disassembly of a sports car

Switch probe
To check the reverse switch is working correctly, turn the ignition on and select reverse gear. Connect one side of the test lamp to earth and probe each terminal in turn. The switch should illuminate when each terminal is touched.
One of the most common problems is a blown bulb. To test it, remove it from its holder and connect it across the battery terminals with a short extension wire. If the bulb lights up the fault lies elsewhere in the circuit.
First check that the bulbholder and wiring terminals are clean and bright. If there is any corrosion, clean it up with wet-or-dry paper then refit the bulb and retest.
If the bulb still fails to light, the fuse may have blown. You should also suspect a blown fuse if two reversing lights go together.
Fuses
In many cases the fuse protecting the reversing lights also covers other accessories (see your car handbook to find out which ones). If none of these is working, renew the fuse and test again. If the fuse blows as soon as you test it there is a short circuit somewhere - it may be easier to get an auto-electrician to trace it.
If other components protected by the fuse are still working, then you need to check the rest of the circuit using a test lamp.
Current check
Turn the ignition on and remove the feed wire to the coil to stop it overheating. Select reverse gear or the 'R' position on an automatic.
Clip the test lamp to a good earth point and probe the live terminal in the bulb holder. If the test lamp lights, current is reaching the bulb. If the bulb has a separate earth lead, the fault must lie in that.
To check the earth run a short wire from the bulbholder earth to a point on the car body. Refit the bulb and check again. If the bulb works, renew the earth lead.
Wiring check
If no current was reaching the bulb-holder you will have to check back along the rest of the circuit.
Find from your workshop manual the colour and route of the reversing wires. Carefully probe the wire along its length. In most cases the wire will disappear into the main loom where you can't get at it. If you find the fault is inside the loom you can bypass it by splicing in a new wire.
Switch test
If there is no current in the wiring, check the gearbox switch. On a manual car there will be two switch terminals. On an automatic there will be four, two of which are for the inhibitor circuit and should not be disturbed (unless you are adjusting the switch - see sideline, left). Check your manual to find the correct terminals for testing.
It may be easier to raise the car on axle stands. Then turn the ignition on and select reverse gear. Connect the test lamp to earth and probe one terminal, then the other. If the lamp lights on both terminals, the fault is in the wiring between the switch and reversing lights. If the lamp fails to light at all, check the wiring between the fuse and switch. If the lamp only lights on one terminal, the switch is either broken or needs adjusting.
To replace a reversing light switch, disconnect the wiring and either unscrew the switch or, if a locknut is used, release this. Replace the switch in reverse order, then adjust it.
Adjusting the switch on a manual gearbox
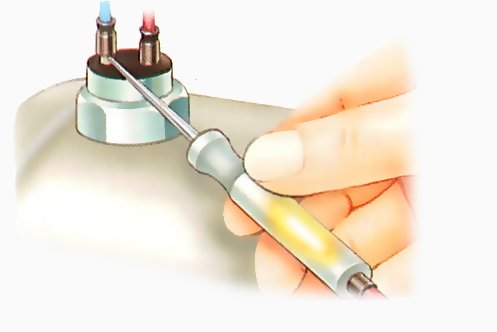
To adjust the locknut type switch, connect a circuit tester across the terminals.
Select reverse gear and slacken the locknut. Screw in the switch until the tester just lights, then do up the locknut.
To adjust the locknut type switch, connect a circuit tester across the terminals.
Select reverse gear and slacken the locknut (right). Screw in the switch until the tester just lights, then do up the locknut.
Other switches are adjusted by unscrewing the switch completely and adding or subtracting shims. The setting is correct when the tester just illuminates as the switch is fully tightened.
Other switches are adjusted by unscrewing the switch completely and adding or subtracting shims (right). The setting is correct when the tester just illuminates as the switch is fully tightened.
Adjusting the switch on an automatic gearbox
Mark the switch and gearbox with a dab of paint.
Some automatic gearbox switches are adjustable. The basic method for adjusting is described here, but you should always check with your workshop manual for the exact procedure.
Start by identifying the four switch wires and terminals, then disconnect them. Move the gear lever to the drive position. Slacken the locknut and unscrew the switch from the gearbox a few turns.
Using a circuit tester with its own power supply (not a test lamp), connect it across the two reversing light terminals. Slowly screw the switch in until the light goes out. Mark the switch and gearbox with a dab of paint.
Screw the switch out until its mark is exactly halfway between the two marks on the gearbox.
Now connect the circuit tester across the two inhibitor terminals. Screw the switch in further until the tester lights up again, and mark this position on the gearbox in line with the previous mark you made on the switch. Screw the switch out until its mark is exactly halfway between the two marks on the gearbox (below), then tighten the locknut.
Refit the switch wires and test that the car will only start with the gear lever in 'P' or 'N' positions and the reverse lights come on only when in the 'R' position.
